Cross stitch, Needlecraft and Embroidery Glossary: Tailor's buttonhole stitch to Two sided insertion stitch
A comprehensive illustrated needlecraft dictionary with clear definitions and working diagrams. Includes 766 terms used in cross stitch, embroidery, tapestry, blackwork, and goldwork. (Click thumbnails to enlarge.)
An alternative to the basic buttonhole stitch and worked in the same way except that the thread is wrapped around the needle before it is pulled through as shown. It can be padded or raised.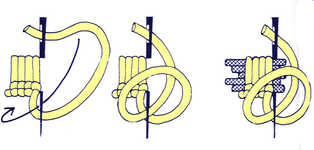
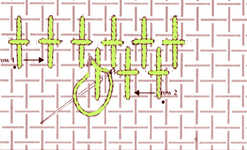
This is similar to upright cross stitch where the rows interlock but with the vertical stitch worked over four fabric threads and the horizontal stitch worked over two threads. Rows are worked alternately from left to right and right to left.
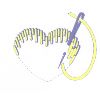
The first row of stitches are alternately long and short stitches and the following rows are stitches of an even length until the last row of the area where stitch length is varied to finish the filling. 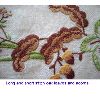
This can be used with fine shading colours. A version called surface long and short stitch is more economical with floss. Other names for this stitch are long and short stitch, shading stitch, embroidery stitch, plumage stitch, feather work and opus plumarium.
The eyes are large enough to take six-stranded cotton or wool. Nos. #24 and #26 are most commonly used for cross stitch The larger needles are used for needlepoint on canvas
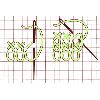
Work a stitch diagonally across two intersections, make a second stitch in the same place but leave a loop of thread. A knitting needle can be used to gauge the length of the loop. Then complete the cross and bring needle out again down and to the right across two intersections ready to start the next stitch. After all the rows are complete, cut loops and trim evenly.
Also known as astrakhan stitch, rug stitch, velvet stitch, raised stitch and plush stitch.
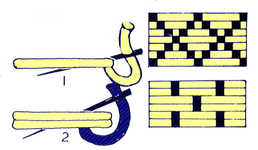
It can also be worked using two different threads, one for the crosses and one for the loops as illustrated.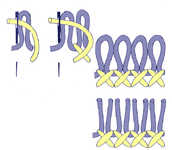 .
.
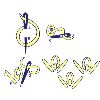
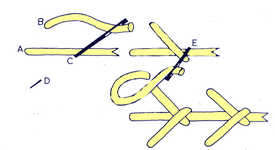
Work a single detached chain stitch coming up and A and inserting the needle at A again, looping thread around the needle and drawing it through at B. Make a small stitch outside the loop at C to hold it flat. Make a pair of slanting stitches on either side of the detached chain from E to F and from G to H.
Trace the design onto good quality tracing paper and cut it out. Pin the paper shape to the fabric and using small stitches tack all the way round close to the edge. Remove the paper.
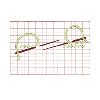
Work left to right bringing thread out at top of first stitch, insert needle diagonally down over crossed threads to bottom of stitch, then bring out to the right of the first stitch. Continue in this way to the end of row. The second row is worked from right to left inserting the needle at top of stitch. Continue working rows backwards and forwards until the area is filled making sure all the stitches slope in the same direction.
However, if working large blocks this method also known as continental tent stitch has a tendency to distort the canvas and the alternative stitching method of basketweave or diagonal tent stitch is more effective.
The Tex count is the weight in grams of 1000 meters of the the thread.
In the Tex system the number of strands in the yarn is ignored (as for Denier).
For example, 60 grams of a T-30 thread would have 2000 meters.
The lower the Tex number, the finer the thread.
Fine threads are T-9 to T-20; Medium threads are T-21 to T-70 and heavy threads are T-71 and higher.
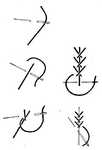
One thread is used for the spine and the stitch which ties it down and either the same or a second thread can be used for the crosses as in the diagram.
The Thread Weight is simply the length in meters of thread that weighs 1 gram.
The number of strands is ignored so, for example, 10 grams of a 40 Wt thread will contain 400 meters; 50 grams of a 30 Wt thread will contain 1500 meters.
The lower the Thread Weight the finer the thread.
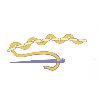
Having worked a row of backstitch, bring needle through centre of one stitch, then weave thread under stitches first from left to right and then right to left and so on without the needle entering the fabric.
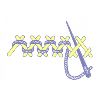
Work a row of herringbone stitch Then lace through it making small horizontal stitches over the crossed part of the herringbone with another colour of thread Also known as interlaced herringbone stitch.
It is made up of a quarter and a half cross stitch.
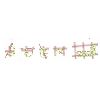
Work from right to left. Begin four threads in from end of stitch line and work two horizontal stitches from this point to the end of line. Bring needle up at starting point and make two stitches to point four threads up and two threads to the right. Bring needle through four threads to left of point and work two stitches back to point, bring needle through again four threads to left. Make two stitches to starting point and then bring needle through four stitches to the left ready to start next stitch. Continue in this way. Also known as point turc, lace stitch, turkish stitch and Bermuda faggoting
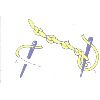
Work from left to right. Bring needle through at A then make a small stitch at right angles to stitch line and pull through. Pass thread over and then under the stitch on surface without needle entering the fabric. then hold thread down with left thumb and pass the needle again over and under the stitch on surface. Pull thread through to make a knot. Space knots evenly and fairly close for best effect. Also known as double knot stitch, old english knot stitch, smyrna stitch and palestrina stitch.
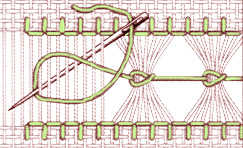
Draw out dome threads from the fabric. Fasten thread at left and then pass thread from right to left under an even number of the border threads bring needle out turning the needle to face horizontally and then make a second stitch over the same number of threads at right angles to the first. A second row of stitches is worked at the other edge of the border by taking half the threads from one group and half from the next as shown and as in ladder hemstitch.
Then take a needle and thread over a group of four or more threads and knotting as shown. Care must be taken to make the tying thread as straight as possible. See also somersault stitch and beaded somersault stitch.
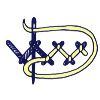
First work a row of herringbone stitch. Using a blunt (tapestry) needle and contrasting thread, slide the needle under the herringbone cross, pointing the needle towards the centre of the line. While needle is held in position, twist thread over and under the needle as shown. Draw tight to knot it. Work a coral knot on each cross along the line always pointing the needle towards the centre of the herringbone band.
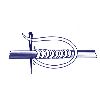
It is done by taking fine whipping stitches over a bundle of three or more loose threads to form the effect of a smooth raised cord. Trailing can be used independently for linear designs, an edging around other stitches and when used in double lines it makes a firm framework for openwork filling stitches. Come up at A, go over the bunch of threads and insert the needle at B very close to A, continue along the line keeping the stitches very close. This is best done when the fabric is held very tightly in a frame.
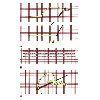
Tramming is done on a double canvas in various ways. For single stitch tramming where the area is not wider than 6 inches, work running stitches across the canvas bringing needle through back to front between small square of the double threads. When working large areas of tramming for a carpet or rug, then the split stitch method can be used where the stitches can be up to five stitches long and the second stitch is worked into the first by splitting the yarn. Vertical tramming is sometimes needed to outline areas. This method is the same as above except that it is worked vertically from top to bottom down the narrow pairs of threads and making the next stitch in the following horizontal intersection of canvas. The tent stitch is then worked over the tramming as shown in diagram C.
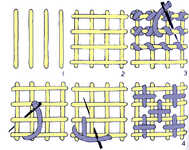
Two finished pattersn are illustrated.
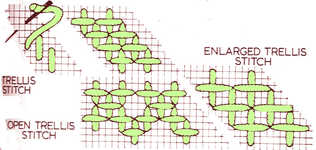
Small upright crosses are worked as illustrated. Variations are open trellis stitch and enlarged trellis stitch
Start with a row of backstitch. Then using a blunt (tapestry) needle come out on the right at A immediately below the first backstitch. Slide the needle vertically under the backstitch and then fold the working thread first over and then under the needle as shown. Draw gently through and pull up to form a knot. Continue, repeating this stitch to the end of the line. Insert the needle at C and take a vertical stitch, the same length as a knot coming out at E. Then work from left to right repeat the knots along the row but this time slipping the needle under the bars between the knots instead of the backstitch. When the required number of rows are complete, the other end from the backstitch is anchored by taking a small stitch over each bar between knots into the fabric
Also a pattern stitch used in smocking. 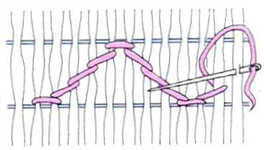 . A combination of outline stitch and cable stitch which is worked over the space between two pleating threads. Three stitches are worked in each diagonal with a downward cable worked at the top and an upward cable worked at the bottom.
As a counted thread stitch, this can be used pulled or unpulled depending on the effect required.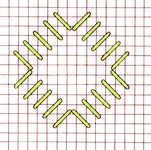
Work five diagonal stitches over two thread intersections from bottom left to top right. Then sharing the same starting hole of the fifth stitch, work five diagonal stitches from top left to bottom right. Repeat these ten stitches making a zigzag line across the fabric. Work the second row from right to left as shown. When one trellis is complete, either finish off the thread or run it through the back of the last five stitches to start the next row. 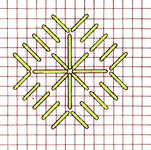
A variation fills the centre with diamond eyelet stitch. Work the trellis stitch unpulled, then work a diamond eyelet stitch with 8 stitches down into the central hole of the fabric. Work these stitches clockwise, pulling them as you go.
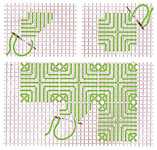
Each stitch unit consists of four triangles placed point to point to produce straight outer edges. Cross stitches at the corners finish off the squares. Work the triangles by straight stitches over 2,3,4,5,4,3,2 fabric threads as shown.
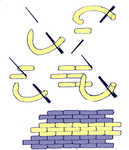
Backstitches are worked in rows of three with each row half way along the stitch of the previous row as illustrated.

This gives the effect of a raised star and the gaps are filled with tent stitch. The first horizontal stitch is worked across eight threads with an oblong cross on top over six horizontal threads and two vertical ones. A vertical stitch is made over eight threads followed by an oblong cross over two horizontal threads and six vertical. The stitch is completed by a central cross over two threads.

A decorative stitch best used singly. First work stitches radiating from the centre in the order shown 1 -12 and then add five upright cross stitches. See also Leviathan stitch and double Leviathan stitch.
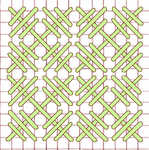
This is a variation of rice stitch where the foundation cross stitch is worked over six horizontal and six vertical threads and then each arm is crossed three times by diagonal stitches over two, three and two intersections.
Multiple rice stitch is a further variation where the base stitch is worked over 8, 10 or more threads and crossed at each corner with more short stitches.
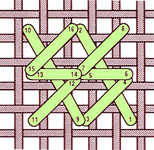
Working from bottom to top and right to left, form a long stitch from over four vertical and two horizontal fabric threads and cross that thread three times following the numbering as shown. The next complete stitch is then worked two vertical fabric threads to the left of the first.
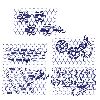
Like blackwork it is made up of bold outlines and then filled with geometric patterns. The outlines are worked in running stitch, The pattern can be drawn on a dark stiff paper and the net pinned to it. The running stitches in thick thread, six strands of embroidery thread, can then be added before removing the paper and working the patterns in finer threads. Care has to be taken over the starting and ending threads since they will all be visible in the finished work. The diagram shows some pattern examples.
Also known as darning on net.
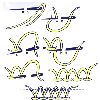
Insert the needle at A and come out at B. Do not knot the thread but leave about an inch hanging. With the thread below the needle on a line with A and B insert the needle at C and come out again at A drawing this stitch tight. With the thread above the needle insert at D and come out again at C, do not draw tight but leave a loop. Make the next stitch with the thread below the needle from E to D and draw tight. Continue along the row making first a loop and then a tight stitch and work in a straight line with the needle always horizontal. Working closely together fill shapes with rows and then cut all the loops at once. 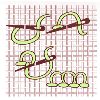
There is also a counted thread version of turkey worked similarly as shown in the diagram.

Work from right to left. Begin four threads in from end of stitch line and work two horizontal stitches from this point to the end of line. Bring needle up at starting point and make two stitches to point four threads up and two threads to the right. Bring needle through four threads to left of point and work two stitches back to point, bring needle through again four threads to left. Make two stitches to starting point and then bring needle through four stitches to the left ready to start next stitch. Continue in this way. Also known as point turc, lace stitch, three sided stitch and Bermuda faggoting
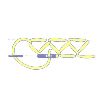
Work from top to bottom. Bring needle out at left side, hold thread down with left thumb and insert needle at right side a little above the starting point. Bringing needle out on right side, a little below the starting point and with thread below needle. then hold thread down again, insert needle at left side immediately below starting point and bring it out on the left side, the stitch being the same length as before, with thread below needle. Repeat
Also known as closed feather stitch and double chain stitch
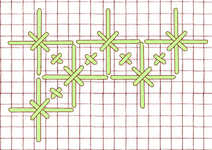
Cover the area to be worked with large upright crosses over six horizontal and six vertical threads spacing as shown. Oversew each upright with a cross stitch over two diagonal fabric threads in the centre and in the spaces add tiny cross stitches over one fabric thread alternating the top cross as shown.
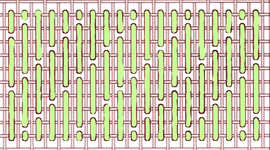
It is worked in diagonal rows from top left to bottom right and consists of vertical straight stitches worked over three or four threads.
 Double twill stitch is a variation where vertical straight stitches over four threads alternate with stitches over two threads.
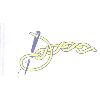
Work as for chain stitch but instead of needle entering fabric in the same place as it emerged insert it to the left across the thread.
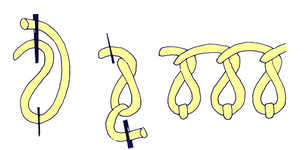
This is a looped stitch with a twist. It is also known as basque stitch.

Work as for ordinary fly stitch but twist the thread over the needle at the base. To overlap bring the needle up through to the middle of each stitch.
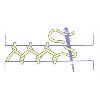
Work from left to right. Insert needle from below a little way in from edge. Then insert needle into top edge from below, a little to the right. Twist needle under and then over thread lying between the two edges then insert needle into bottom edge from below a little to the right. Continue working into each edge alternately twisting needle each time.
Also known as faggoting stitch.
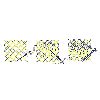
Using a tapestry make a ground work of parallel diagonal lines. Then weave under and over at a 90° angle to make diamonds. Weave a series of identical horizontal lines across the lattice as shown, alternating the needle direction between up and down as show. When the first rows are complete add a second series of horizontal lines to fill in between the previous thus making double stitches.
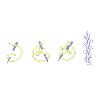
This is quite a difficult stitch until the rhythm has been discovered. Make sure that the needle points well outwards to leave sufficient room to work comfortably. Start at top of stitch line. Bring thread through and hold down to the left with your left thumb. Make a slanting stitch from left to right as shown in the diagram, bring needle out above working thread. Hold down to right, then take a slanting stitch from left to right and pull through with needle over working thread as shown in the diagram. Make another stitch to the left, then another to the right and so on, holding last loop with a tiny stitch.
Also known as Spanish knotted feather stitch.
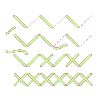
Four journeys on each row are necessary. Work first row from right to left, starting at bottom right corner of first cross. Insert needle four threads up and four threads to the left and bring out again eight threads from the starting point to the left. Continue along row so both sides have one diagonal stroke worked. On second row work same way but from left to right. At end of second row make a half cross stitch back to centre of cross then another up to top right corner, then work along row as before. Work fourth row as before from left to right to complete all crosses on both sides.
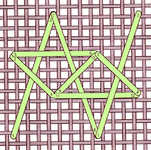
Each long arm is crossed twice following the numbers as shown.


