Cross stitch, Needlecraft and Embroidery Glossary: Radiating stitch to Rya stitch
A comprehensive illustrated needlecraft dictionary with clear definitions and working diagrams. Includes 766 terms used in cross stitch, embroidery, tapestry, blackwork, and goldwork. (Click thumbnails to enlarge.)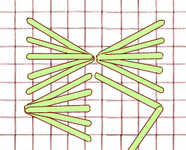
This consists of triangles worked over four fabric threads wide using five stitches radiating from the same hole as shown. Work in vertical rows with each alternate triangle facing the opposite direction. There may be gaps between rows which can be filled by backstitch.
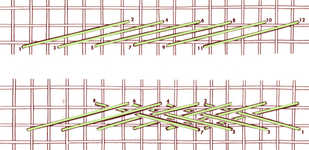
This makes a thick braid. Work all the left to right stitches first and then on the return the thread is woven under the last two stitches before it goes back into the fabric as shown.
Also known as knit stitch.
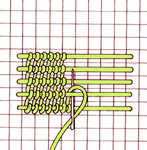
Lay bars across the area to be worked making a long stitch behind the work to keep the bars at the correct tension. Bring the needle up at 1 just above the bottom bar and then without going through the fabric, weave under the bottom bar, under 2 bars, back over the second one up, under that one and the next, back over the third bar up, back under that one and the top one, then take the needle down through the fabric at 2. Repeat this along the length of the bars, starting the next under and back over movement just right of 1 and packing the rows together tightly for best effect. In a shaped area, radiate the bars and make them of different lengths to fit the shapes. They may need to be stitched down in places to produce a curved outline. When working shaped areas, pack the stitches even tighter.
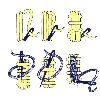
The horizontal bars are formed by working straight stitches over threads two vertical fabric threads apart. Work these from side to side with a long stitch to the back of the fabric..
When the bars are complete, bring the needle to the front of the work at the left hand end of the area immediately below the top bar. Work buttonhole stitch over the bars in turn, working down the rows and not going through the fabric. Do this by forming a loop of thread, sliding the needle under the top bar and up through the loop pulling it firmly. Repeat this over the second bar and continue until the bottom bar has been stitched over. Then anchor the loop of the last stitch to the fabric with a little stitch.
Bring the needle behind the fabric and up to the front beneath the top bar as before. Work a line of stitches as before and continue in this way until the band has been completed.
In a shaped area complete the bars from edge to edge across the whole shape. Start at the left hand side and work in vertical rows as normal filling in the shape.

First make a series of parallel lines close together, then add a second series on top of the first but closer to the centre so that it is more raised. Then lay a series of parallel bars across at quarter inch intervals. Then with a blunt (tapestry) needle come out at A, form a loop with the thread and without entering the fabric pass the needle from B to C through the first bar and pull tight. Then pass the needle through the next bar from D to E and so on until the bottom where the thread is secured by entering the fabric at F. Always working top to bottom, complete more rows.
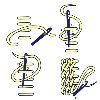
Make a series of parallel bars as shown. Then with a blunt (tapestry) needle come out at A, form a loop with the thread and without entering the fabric pass the needle from B to C through the first bar and pull tight. Then pass the needle through the next bar from D to E and so on until the bottom where the thread is secured by entering the fabric at F. Always working top to bottom, complete more rows.

Work a horizontal straight stitches, fairly close together. Start at the top with a contrasting thread, the needle does not re-enter the fabric after this. Pass thread over and under first bar coming out on left side. Holding thread down under needle, take needle over and under bar to the right of centre and pull through. then repeat over next bar and so on.
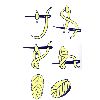
Starting at the top of the shape make a small stitch between A and B. Then bring the needle out at C slightly to the left at the base of the shape. Using a blunt (tapestry) needle, slide through stitch AB from right to left without entering the material. Insert the needle at D slightly to the left of the base of the shape and bring out again at E immediately above C on the outline of the shape. Slide through the stitch AB from right to left again. Go into the material at the base on the right and out again on the left just above the other stitches. Continue until the top of the shape.
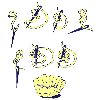
Make a triangle of three backstitches in the centre of the area to be worked. Using a blunt (tapestry) needle slide the thread under a backstitch without entering the fabric, taking the thread over and then under the needle as shown. Pull through gently to form a knot Repeat making a second knot beside the first one in the same bar. Continue making two knots on each of the next two bars of the first row. Then make the next row by sliding the needle under the bar between each knot. Work round and round and if necessary add an extra knot into the bars to increase the size of the cup.
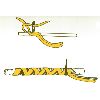
Stitch a line of string to the fabric and then sew two threads of gold ( or one of gold and one of silk) over. Take a double stitch over the gold, close to and parallel to the string. Then fold the gold over the string and repeat this double stitch on the other side. plunge the ends of gold through the material when the line is complete.
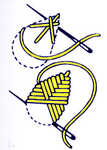
Make three stitches at the top of the area to be filled, then insert the needle at the top right margin and bring out on the left margin exactly opposite as shown. Continue working stitches alternating between bottom left to top right and top left to bottom right as illustrated until the area is filled.
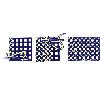
Start with squared filling. Fill the area with long horizontal stitches about quarter of an inch apart. Then lay threads in the opposite direction making perfect squares. Starting at the top and with a blunt (tapestry) needle and a contrasting thread whip each thread from left to right working down to the bottom. At the bottom go through the fabric to anchor the thread and come out again a fraction away and whip up to the top on the same thread again weaving the needle under from right to left. Whip all the upright bars in this way and then repeat on the horizontal bars.
Because the intersections are crossed four times they become raised.

Using a blunt (tapestry) needle, make two long stitches between A and B which lie side by side being careful not to pull too tightly. Then starting at A again weave by passing the thread under the long stitches without entering the fabric, first passing from the centre to the left under the left hand stitch and then from the centre to the right under the right hand stitch until the long stitches are completely covered.
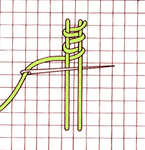
Make two long stitches ( the bars) side by side in adjacent fabric holes as shown. Come up at the starting point once more, then on the surface of the work start to weave first under the right hand thread and over the left hand thread, then under the left hand thread and over the right hand thread and so on. Pack the weaving quite tight pushing the thread back with the needle as you go. When the bottom of the bars is reached take the thread through to the reverse of the fabric.
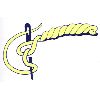
Work rope stitch, but leave the stitches loose to form a raised ridge.
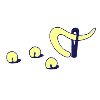
Work small stitches over the area to be covered but leave each stitch loose to form a bump. A thick thread must be used to make them stand up.
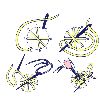
Using a blunt (tapestry) needle, bring the needle out of the fabric at A and insert at B across a diagonal of the circle. Then make the stitch CD slightly off centre, then EF and finally GH. H is quite close to D. Then bring the needle out at I and pass it under all the stitches at the centre looping the thread first under and then over the needle and pull up to form a knot in the centre. Take another needle with a contrasting thread and pass it under the spokes. Take this thread from its needle and hold both ends taut upwards, while weaving under and over, round and round with the original thread.
When the weaving is complete finish off the main thread and pull out the contrasting one.
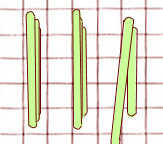
This can be used for an outline or border or worked to fill a shape where a dense raised area is required. Each spot stitch is worked over four horizontal fabric threads by working straight stitches into the same holes over and over again. The stitches must be packed tightly and as many as fifteen or twenty stitches can be worked into the same hole until the needle is unable to pass through again.
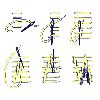
After the bars are worked over the area to be covered, use a blunt tapestry needle and come up at A and without piercing the fabric pass thread from B to C and then D to E and so on to top bar.
Reverse direction of needle on the downward stitches and then add other rows in the same or contrasting colours to complete as shown.
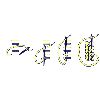
Work a series of parallel stitches as in diagram but to fill an area they should be laid across the width of the shape. Changing to a blunt (tapestry) needle, come out at A and holding the thread to the left of the needle slide under from B to C without going through the fabric. Then pass needle through from D to E and so to the top. Always restarting at the bottom work as many rows as necessary to cover the base threads.

First lay long satin vertical satin stitch to fill the area making tham thicker in the centre to give a raised effect. Then add horizontal stitches at regular intervals. Stem stitches are then worked into these horizontal stitches as illustrated without going through the fabric except at the top and bottom where all stitches should pass through the same hole.
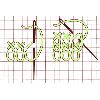
Work a stitch diagonally across two intersections, make a second stitch in the same place but leave a loop of thread. A knitting needle can be used to gauge the length of the loop. Then complete the cross and bring needle out again down and to the right across two intersections ready to start the next stitch. After all the rows are complete, cut loops and trim evenly.
Also known as astrakhan stitch, rug stitch, tassel stitch, velvet stitch and plush stitch.
It can also be worked using two different threads, one for the crosses and one for the loops as illustrated.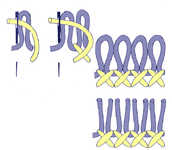 .
.
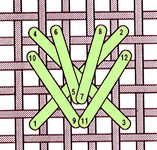
A large cross stitch is worked over four fabric threads and then crossed with four straight stitches following the numbers in the diagram.
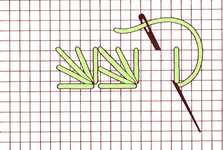
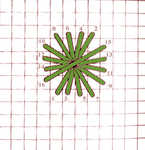
This is worked by making five straight stitches all coming from the same starting point and worked to form a square covering four horizontal and four vertical threads. Work first upright stitch over four threads, second stitch two threads to the left, third stitch two threads to the left of that, fourth stitch two threads down from third and fifth stitch horizontally. Bring needle out eight threads to the right to begin next stitch. The next row is worked in the same way but the fan points in the other direction
Sometime known as fan stitch but there is another stitch of that name.
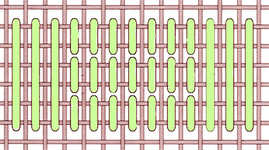
All stitches are worked from bottom to top. Start at the right and work the three long stitches first. Work the shorter stitches from right to left, left to right, right to left again in twos and then work the three long stitches on the left.
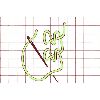
Work vertically, from top left of fabric. Bring needle through and left and left across two threads, insert needle and bring out immediately below and then take up over two two threads, insert needle and cross diagonally two threads down and one to the right. Bring needle out and insert again two threads above that point and bring out again three threads sown and one to the right for the next stitch
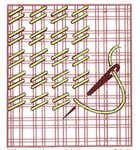
This a canvas stitch which must be used on double canvas. It is similar to tent stitch but the stitches are always worked downwards in vertical rows and are less slanted. It is named after the fabric which it resembles.
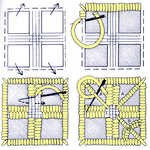
Running stitches are worked around the area to be cut and the cut area is bounf by overcast or buttonhole stitch. Patterns with bars are worked in the open shapes.
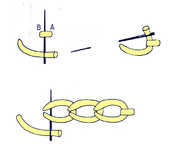
Work from right to left. Make a small horizontal stitch first and then a link under that stitch without putting the needle through the fabric. Continue making links in this way always passing the needle under the previous link. The finished chain looks exactly like chain stitch. Also known as broad chain stitch.
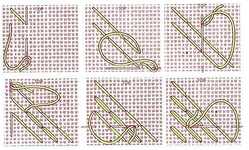
Worked as shown, this stitch fills a square area working one half at a time.
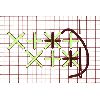
The first pass consists of cross stitch and upright cross stitch worked across four threads or intersections, with the adjacent row alternating the crosses and uprights. Then the second colour in used to add crosses over upright crosses and upright crosses over crosses as shown
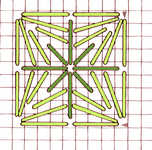
Work as shown with stitches radiating from each corner of the square. Work each corner in turn with four stitches down into the corner and two into the hole one thread intersection diagonally inwards.. Next form a star by working 8 stitches into the central hole in a contrasting thread or colour. Work the vertical and horizontal stitches over 4 threads and the diagonal stitches over 2 thread intersections.
On subsequent squares the outer stitches are not worked again but shared with the square before.
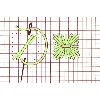
Starting at the bottom left hand corner, bring needle out and insert six threads to the right and six threads up. Bring needle out one square to the right of the starting point and insert one stitch to the left of the top of the first stitch. Continue to the opposite corner of the square when the stitch is six threads up and six to the left, then bring needle out again one thread up from the bottom right corner of the square and insert one stitch down from the top left corner and so on until the whole square in complete. Then take one small stitch in the centre through all the layers of thread and fabric and bring out at the bottom right corner which is now the starting point for the next stitch.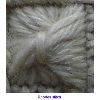
 The variation can be worked similarly to Rhodes stitch but with the corners left unworked as shown. Both stitches have to be always worked in the same order so that the top stitch is always in the same diagonal.
Stitches used are daisy stitch, french knots, snake stitch, stem stitch and bullion stitches, usually to make flower pictures. See also ribbon stitch, ribbon rose, and fly stitch rose.
 Worked in one colour or three shades of the same colour starting with the darkest ribbon. Make a french knot with the first shade and then four straight stitches around the centre in the medium shade and finish with six or seven straight stitches around the outside in the lightest shade. Another method of making roses with ribbons uses fly stitch.
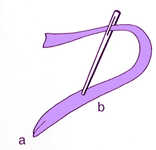 Bring the needle through from the back of the work at a and take through to the back of the work by passing it through the ribbon at b. The stitch is left loose to leave a loop.

Two backstitches are worked into the same hole to make a raised dot. This can be worked regularly as illustrated or as an outline or randomly. It is also known as simple knot stitch, dot stitch or seed stitch.
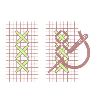
This is usually worked in thick thread for the large cross stitch and a fine thread for the small straight stitch. Work a row of cross stitch over four threads each way. With the finer thread work diagonal stitches over two threads each over the corners of each cross stitch as seen in the diagram.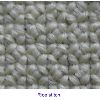 .
.
Among the variations are captive rice stitch and simplified rice stitch.
It can contain free motifs which are held to the main fabric by bars. Work the first row of running stitch close to the outline and when a bar is met, work as follows. Carry thread to opposite motif which is to be held by same bar and make a small stitch within the area that is to be covered by buttonholing. Carry thread across to first side again and make a small stitch there. Take the thread back to the second side and make a final short stitch. There are then three threads joining the motif. Work buttonhole stitch over the three threads without needle entering the fabric and continue until back at the first side. Continue in this way until all the bars are worked and then do another row of running stitch before edging the main fabric with buttonholes. A buttonhole bar can be decorated with a picot as shown in diagram B. Work buttonhole stitch to half way across bar and then pass the thread over the bar without making the knot of the buttonhole stitch, leaving a loop below. Hold the loop with a pin. Take the needle under the three threads and over the working thread from left to right as shown, remove the pin and continue with the buttonhole stitching along the bar.

This is worked in vertical rows from the top of the area to be covered starting at the left hand side. Each oblique cross stitch is worked over four vertical threads and interlocks with the stitch above by overlapping one thread.
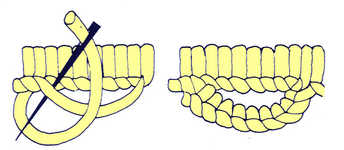
This is worked at intervals along a buttonhole edging as illustrated.
Work from right to left. Bring needle through fabric and insert three threads down. Bring out six threads up and three threads to the left and insert at starting point. Bring needle out three threads up and six threads to the left and insert three threads back. Continue making backstitches like this following outline on diagram. When row is complete turn fabric round and work back in same way as before.
All connecting stitches are worked into the same holes.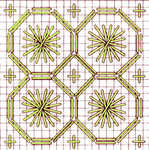
A variation is to add a Rhodes stitch variation into the octagon and upright crosses both not pulled into the small diamond areas as shown
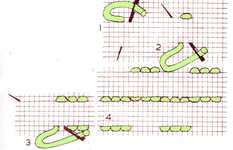
Single stitches are worked in groups of three five spaces apart as shown with the lower line becoming the top line for the next set of three stitches.
Begin by forcing open two holes in the canvas or fabric at A and B six threads apart, with a stiletto or closed scissors. Come out at A, the lower hole and in again at B , six threads above. With the thread to the left of the needle come out again at C, three threads below B and half way between A and B. Make a small horizontal stitch across the first stitch by going in at D, one thread to the left at C and out again at A. Insert the needle at B again and then come out again at D. Repeat this twice more going one stitch to the left each time. With the thread to the right of the needle come out again at C and repeat the stitches just made three times but now on the right of centre.
A grid of interlocking stitches can be made as in the diagram.
Queen stitch is a variation where only four vertical stitches are worked.
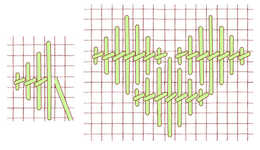
A diamond is made of seven straight stitches each tied down with a small stitch in the centre over one fabric thread and the previous stitch.
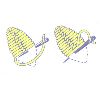
It is easier to achieve a smooth edge with this stitch and little thread is wasted on the back. Bring needle through at left edge of shape to be filled and insert it at the right edge. With thread below needle bring needle through just to right of centre of shape. Take thread over long stitch insert needle just to the left of centre and bring it out again on left side of shape. Repeat. Also known as roumanian stitch.
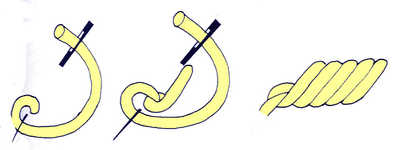
The stitch is worked from right to left by working slanting stitches. A small knot is made by pulling the needle through over the working thread which should not show on the surface but make the lower edge slightly raised.
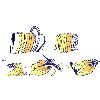
Double a piece of thin card so that it measures the size you want your loops to be. Mount the work in a frame and hold the card in place along the centre of the leaf shape. Using thick thread come up on one side go over and down on the other side, inserting the needle close to where it came out but not in the same hole. Make three light coloured stitches, three medium and three dark. Slide the cardboard out. Carefully turn the loops inside out pushing the dark ones through the light so that when twisted the loops form a leaf or petal shape, shading from dark to light. Bring the needle out at the end of the shape and sew through the last loop of the dark colour which has been twisted right through. Insert the needle in the same hole as it came out to hold the top of the leaf.
These shapes can be used for leaves or flower buds.
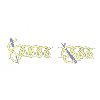
Work from right to left. Bring thread through at top of stitch, pass the thread over to the left side and hold down with the left thumb. Inset the needle a short distance to the left of where it originally came through and bring it out at the bottom of stitch (A) with the thread under the needle point. Pass needle under top thread (B) without entering fabric. Continue to work in this way.
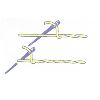
The couching thread makes a fairly long stitch across the laid thread as shown in the diagram. It is worked in the same way as bokhara couching apart from this
The motifs are worked in cross stitch with the background left uncovered. Small offshoots in double running stitch are attached to the cross stitch

It is easier to achieve a smooth edge with this stitch and little thread is wasted on the back. Bring needle through at left edge of shape to be filled and insert it at the right edge. With thread below needle bring needle through just to right of centre of shape. Take thread over long stitch insert needle just to the left of centre and bring it out again on left side of shape. Repeat. Also known as roman stitch.

Work a stitch diagonally across two intersections, make a second stitch in the same place but leave a loop of thread. A knitting needle can be used to gauge the length of the loop. Then complete the cross and bring needle out again down and to the right across two intersections ready to start the next stitch. After all the rows are complete, cut loops and trim evenly.
Also known as astrakhan stitch, rug stitch, tassel stitch, raised stitch and plush stitch.
It can also be worked using two different threads, one for the crosses and one for the loops as illustrated. .
.

Work from left to right. Each stitch should be of equal length crossing over three or four threads but picking up only one or two threads in between.
Double running or holbein stitch is a variation on running stitch.
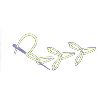
Work a chain stitch in the usual way and then work two detached chain stitches from it as shown in diagram.
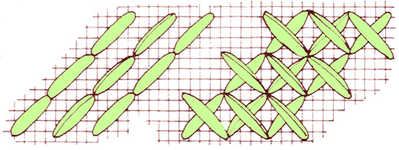
Diagonal stitches are worked as shown with every second row worked double. The second leg of the cross is then worked double as illustrated.

A pile stitch used mainly for rugs but can be used in canvas work.
All rows are worked from left to right and the bottom up. Pass needle under one vertical thread and pull through. Pass needle through next vertical thread and hold loop down to required length.
As with all pile stitches the loops can be cut or left uncut.
System Upgrade
The shop is shut for most of this week while we do a system upgrade.Please accept our apologies for any disappointment.


