Cross stitch, Needlecraft and Embroidery Glossary: Padded Appliqué to Purls
A comprehensive illustrated needlecraft dictionary with clear definitions and working diagrams. Includes 766 terms used in cross stitch, embroidery, tapestry, blackwork, and goldwork. (Click thumbnails to enlarge.)
Cut out the shape required in felt and attach to the background leaving one side open. Fill with cotton stuffing to the depth required and then close the open end. Work a row of stitches across the shape and then using a blunt (tapestry) needle ` weave ' in the opposite direction as shown.
Other stitches such as trellis, ceylon or raised chain, stem or buttonhole could be used to cover the raised area.
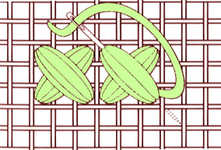
This forms a raised stitch by working each half of the cross several times to the desired thickness.
In the free embroidery version, starting in the centre of the shape come up at A and down at B. Fill shape with stitches, then go across at right angles with a few stitches to hold the long ones flat. For a second padding go up and down vertically again. Come up at A, down at B and cover the whole shape with slanting stitches. To keep the slant, A should always be a fraction ahead of the last stitch and B very close to the previous stitch.
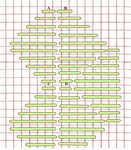 In the counted thread version, the diamond shapes are worked first and then each area padded after it has been stitched. The shape is worked by ten satin stitches of graded length as shown and the mirror image also worked. The same thread is then brought out of the canvas at A and threaded under the left hand triangle coming out at C. Then threaded through the right hand triangle from D to B, not passing through the canvas again. This process is continued until there is the required amount of padding and then the thread is passed back through the canvas to the reverse.
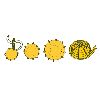
Working with a simple shape such as an oval or circle, cut a piece of yellow felt to fit exactly. Then cut four more pieces each one slightly smaller than the last. Start with the smallest piece and sew it to the centre of your shape with tiny stitches all round and then the second piece on top and so on until the felt pieces are used up. Mark the couching lines on the padded surface and fold the length of gold in half and fix the folded end to the centre of the circle. Then couch round and round in increasing spirals placing the couching stitches at the marked places.

Baste muslin to the reverse and outline the design on the right side with backstitch. Make a slit in the muslin and stuff with cotton, pushing it well into the corners. Stitch together the slit in the muslin and trim away the excess.
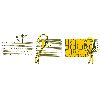
Fill the area with horizontal rows of string, taking small stitches first on one side and then the other and cut the end of the string with a sharp blade taking care not to cut the base fabric. Then couch pairs of gold thread over the string using a pattern to suit the finished effect.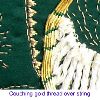
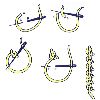
Bring needle out at A and make a small stitch between B and C. Slide the needle through the bar just formed and holding the looped thread under the needle slide through again just to the right of the first stitch. Then make a horizontal stitch from D to E below the first and about the distance of one knot away, continue to make a row of stitches. Also known as double knot stitch, tied coral stitch, old english knot stitch and symrna stitch.
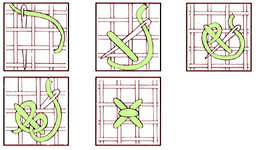 The counted thread stitch is worked over a two thread square. Make the first diagonal of the cross from right to left. Go under the diagonal twice each time, keeping the needle over the thread loop. Finish by going down into the fourth corner.
See also zigzag palestrina knot.
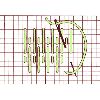
Work from left to right make upright stitches over six and two threads alternately centred around the same thread. The second row is the same but the longer stitch is worked below the shorter and the shorter below the longer as shown. A variation is double Parisian stitch also known as old Parisian stitch. It is similar to Parisian stitch but the stitches are worked in pairs and longer over nine and three threads.
There is a worldwide history of this technique. In Mexico and Guatemala, pattern darning decorates women`s blouses with bold, geometric patterns. In ancient Peru, geometric patterns were embroidered on the edges of large mantles and their descendants still decorate their ponchos with these patterns. There is also a strong European tradition of pattern darning, in Sweden, Southern Russia, the Ukraine and Greece. In the UK today , the technique is often combined with blackwork on table linen.
See damask darning and huckaback darning.
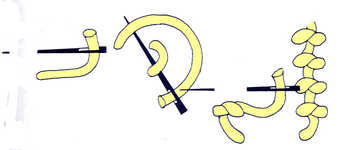
This makes a straight beaded line. After the tiny vertical stitch is made, the needle is inserted through the loop and into the fabric. The working thread is tightened firmly before beginning the next stitch. Worked closely together this resembles a string of pearls.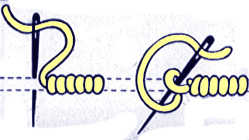
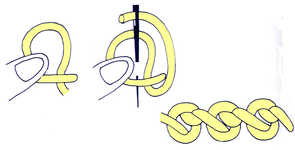
A loose loop is made around the needle and tightened after the needle has entered the fabric but before it is pulled through completely. Hold down the loop with the left thumb while pulling the needle through.
These knots are characteristic of the rich silk embroideries of China where they often are worked closely over large areas. Also known as Chinese knot, forbidden knot and blind knot.
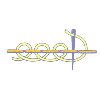
Work a row of backstitch. Interlace with a contrasting or toning thread as shown in the diagram. Also known as laced backstitch, forbidden or blind stitch.
The threads are grouped in pairs both across and down and can also have a different coloured thread at intervals. The stitches can either be worked over the two threads or for finer work over one. Also known as double canvas.
Tips for using :-
Cut the paper on the solid areas between holes;
Round off corners;
Smooth edges using fine sandpaper or an emery board.
It can be placed in parallel rows or varied in length to fill a shape such as a leaf or petal. Work from left to right.
Bring needle through just above the centre of space being worked. With thread to the right, insert needle at the bottom of space and bring it up just below centre, with thread under needle. Still with thread to right, insert needle at top of space and bring it out just above centre with thread under needle. Continue in this way.
Also known as cretan stitch, long armed feather stitch and when worked in a straight line quill stitch and alternating buttonhole stitch.

This is worked in a series of four rows consisting of vertical groups of three diagonal stitches. Each stitch is over two fabric threads. The working direction and the slant of the stitches alternate from group to group. Usually worked in contrasting colours as shown. Overall effect is best if colours alternate with each row.
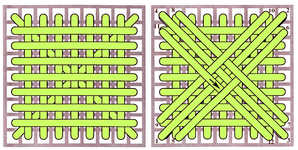
This is a bulky stitch with several layers. Start with a large cross stitch over an eight fabric thread square. Then work seven straight vertical stitches from bottom to top starting one thread to the right of the bottom left of the cross and ending one thread to the left of the top right of the cross. Then work seven straight horizontal stitches from left to right starting one fabric thread below the top left of the cross and finishing one thread above the bottom right of the original cross stitch. The final layer adds another large cross over the original with a diagonal straight stitch either side of the central cross stitches as shown following the numbering, the final stitch being passed under a previous stitch as illustrated.

Work from right to left. Bring thread through folded hem edge two threads in then make a vertical stitch over the two threads into the main fabric. Bring needle out four stitches to the left, insert back at previous point on main fabric, then bring out again through folded hem four threads to the left and two threads down.
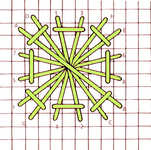
Work 4 stitches over 8 threads following the numbers. Then work the 4 stitches shown in the diagram following the letters. These stitches can be worked in the same colour or a contrast colour to the base stitches. Stitch G-H should always be worked last of the long stitches. The shorter stitches are then added.
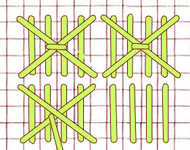
Work four straight vertical stitches over four fabric threads and then a large cross stitch across four fabric intersections over the top and tie down with a short horizontal stitch over the centre.
Work from left to right across fabric making a diagonal stitch up to right across four intersections, bringing needle out four threads below and crossing the first stitch by inserting needle four stitches up and two to the left. Continue for this and the following rows always working from right to left so that all the crosses are in the same direction and working the top of the stitches of the following rows into the bottom of the previous row to give a close filling stitch
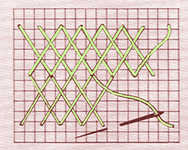
This is worked in horizontal rows from left to right and can be worked over fewer threads than the illustration e.g. making the cross over one horizontal and two vertical threads. It is an economical filling stitch because the reverse on the work only has a series of backstitches.
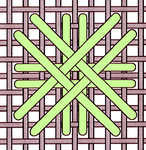
A large stitch worked over seven fabric threads square. An upright cross is made by two straight horizontal and two straight vertical stitches. A diagonal cross is then formed by two stitches from either corner.These last four stitches are worked over and under as shown.
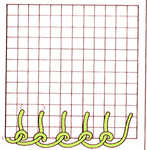
When the central design has been completed, remove the fabric or canvas from the frame, block it and trim the excess fabric, leaving at least twice the number of threads you plan to work the plaited edge stitch over. Fold the spare fabric to the back leaving the number of threads you wish to work over visible. Come out at 1 through the fold, go down at 2, one thread across and three threads up from 1 through both layers of fabric and pull the thread almost through. When the thread is almost snug onto the fold of the fabric, take the needle and thread over and down through the loop, then go down at 3, through both canvas layers as before. Continue the row in this way and the loops will form a plait lying along the fold.
Work this stitch into every hole for a tight firm edge or into alternate holes as shown for a slightly looser effect. If you need to go round corners work a number of stitches through the same hole at the corners.
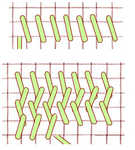
Work a row of stitches over one vertical and two horizontal fabric threads. The following row is worked in the opposite direction and slopes the other way so that it overlaps the first row of stitches and so alternating direction and slope.
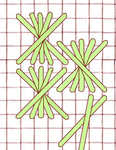
A variation of half Rhodes worked over only four fabric threads square. Work in horizontal rows with the direction of the stitching clockwise and counter clockwise alternating.
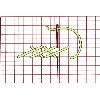
Work from left to right. Start at bottom left and work the bigger part of the stitch to top right, then bring needle through below at bottom right and work up to top left, which is only halfway to the starting point. Bring needle up below to start next stitch.
Also known as long armed cross stitch or long legged cross stitch.
It can be used for three dimensional work and does not fray.

Come out at A and down at B, making a vertical stitch. Then come up at C and down at D close to AB making another vertical stitch below. Repeat without packing the stitches too close together but covering the fabric. On the second row of stitches come up between those of previous row as shown.
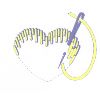
The first row of stitches are alternately long and short stitches and the following rows are stitches of an even length until the last row of the area where stitch length is varied to finish the filling. 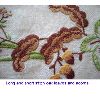
This can be used with fine shading colours. A version called surface long and short stitch is more economical with floss. Other names for this stitch are long and short stitch, shading stitch, tapestry shading stitch, embroidery stitch, feather work and opus plumarium.
It may be necessary to pierce the holes with a stiletto or large needle first before taking the ends through to the reverse.
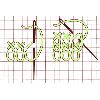
Work a stitch diagonally across two intersections, make a second stitch in the same place but leave a loop of thread. A knitting needle can be used to gauge the length of the loop. Then complete the cross and bring needle out again down and to the right across two intersections ready to start the next stitch. After all the rows are complete, cut loops and trim evenly.
Also known as astrakhan stitch, rug stitch, tassel stitch, raised stitch and velvet stitch.
It can also be worked using two different threads, one for the crosses and one for the loops as illustrated.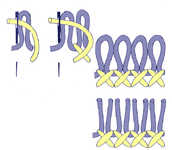 .
.
Using a blunt (tapestry) needle come up at A under the hem, insert at B and out again at A. Insert the needle again at B and bring out at C directly above A in the hem. Insert again at A and bring out at D. Continue along the hem, pulling the stitch tightly to form large holes.
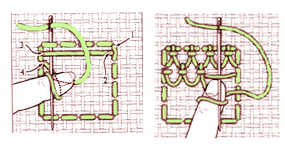
The area to be covered is outlined in backstitch with one strand of floss. Bring the needle to the front of the work and lay a thread across the fabric. Work across the laid thread as illustrated and repeat across each row without going through the fabric.
Also known as holy point, nun`s work and hollie-point stitch.
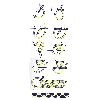
Using a blunt (tapestry) needle and fine thread bring the thread out at A and insert at B, above and to the right of A and bring out again at A. With the needle horizontal, insert it at B and bring out at C, level with B and the same distance again beyond A. Work another stitch from B to C, then work two stitches from A to C. Insert again at A and bring out at D twice, making these stitches the same length as the others already made. Continue along the line. The threads should be pulled so tightly that they almost disappear but they open large holes in the fabric and the final effect is formed by the holes. Also known as three sided stitch, lace stitch, turkish stitch and bermuda faggoting
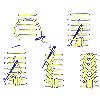
Work a series of parallel stitches as shown. changing to a blunt (tapestry) needle, wrap round the first two threads A and B as shown four times. At the fourth stitch only pass under B and then wrap round B and C twice, on the second stitch only passing under C.
Continue in this way to the top and then return to the bottom and work a second group of slanting stitches but in the opposite direction.
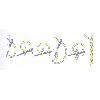
Begin as for ordinary stem stitch. Then bring needle down and pass under stitch ( not entering fabric), then pass needle under stitch again to the left of first coil. Then work another stem stitch, then pass needle twice under this and previous stitch together. Keep working in this way.
Trace the design onto good quality tracing paper. With a crewel needle poke holes through from the underside of the paper at about quarter inch intervals. Pin the paper to the fabric and use a small pad of felt dipped in powdered French chalk to rub it into the holes.
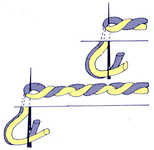
Backstitch is worked with two threads in the needle which can be of contrasting colours. The loosely twisted threads are split by the needle every time it is brought to the front of the work.
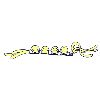
Work a line of couching, but instead of laying the threads flat on the fabric, raise them a little with your needle as you go.
Stitches used include algerian eye, backstitch, double backstitch, chessboard filling, cobbler filling, four sided stitch, honeycomb filling, mosaic filling, pin stitch, punch stitch, ringed backstitch, three sided stitch, reverse faggot stitch, coil filling stitch, wave stitch filling and whipped satin stitch.
In pulled thread work, unlike drawn fabric work threads are cut to make the holes. Some stitches are however common to both. Also known as drawn thread work.
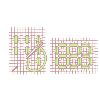
Work horizontal rows first. Work from right to left. Make two vertical stitches over four threads in the same place, then bring needle out four stitches to the left for next two stitches. Continue along row in this way and then work other horizontal rows in the same way turning fabric round for each. Turn fabric at right angles and work vertical rows in the same way as the horizontal rows.
Also known as framed cross stitch.


