Cross stitch, Needlecraft and Embroidery Glossary: Baby Snuggle to Byzantine stitch
A comprehensive illustrated needlecraft dictionary with clear definitions and working diagrams. Includes 766 terms used in cross stitch, embroidery, tapestry, blackwork, and goldwork. (Click thumbnails to enlarge.)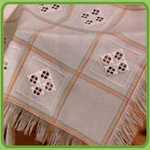
Each square is 5" wide and is ideal for any design which requires a small stitching area. The borders are woven with rainbow coloured lines
Picture courtesy of Zweigart.
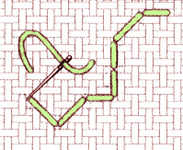
In counted thread work a stitch worked over one or two threads. The stitch is straight but can be worked horizontally, vertically or diagonally. When working over two threads it can also be worked at an angle of one stitch horizontally and two vertically or one vertically and two horizontally. 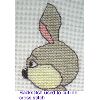
Backstitch is used to outline cross stitches sometimes at the edge as in cartoons and sometimes in the middle of work to give detail. It can also be worked alone to make outlined shapes. If worked on a diagonal with a cross stitch it is best to only work a quarter cross stitch.
In drawn fabric work a backstitch is pulled tightly.
It can also be a free embroidery stitch. 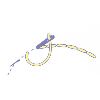
Work from right to right. Bring needle through on stitch line, insert it a short step back and bring it out again at an equal distance in front of starting point. Repeat along line.
Variations on this stitch in free embroidery are threaded or laced, double and whipped.
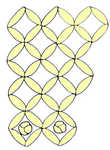
Work zigzag backstitch in horizontal rows to make diamond shapes as illustrated. The speces can be infilled with french knots as in the diagram.
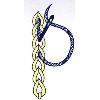
Similar to a French knot but makes a bolder stitch and is used extensively in candlewicking.
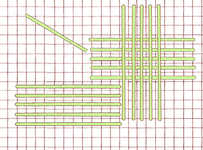
Work five vertical straight stitches over 13 threads and then cross with five vertical threads of the same length. The next block is worked diagonally downwards and the blocks interlock. This stitch covers areas quickly and can be used to graduate colour but is unsuitable for cushions or upholstery because the long stitches may snag.
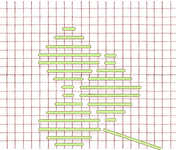
Horizontal satin stitches are worked in a balloon shape over 2, 4, 6, 8, 8, 6, 4, 2 threads with the next block interlocking. A useful filling stitch for large areas and backgrounds.
The diagram shows one example. It is normally worked only in one direction but it can also be worked in four directions giving a kaleidoscope effect.
Also known as florentine stitch, flame stitch and irish stitch.
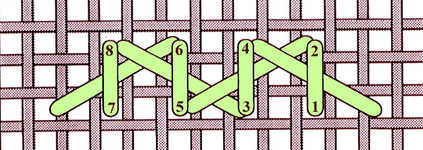
Work herringbone stitch as normal from left to right and on the return from right to left, work the bars following the numbers as shown.

A row of small upright evenly spaced stitches are worked and then joined by diagonal stitches. As a single row it can be used for a border but it can also be used as a filling stitch when rows are placed above each other in straight lines. When the slanting stitches are from bottom right to top left it is known as barrier or fence stitch and when from bottom left to top right it is known as Bosnian stitch or yugoslavian border stitch. Also known as zigzag Holbein stitch.
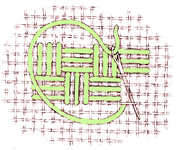
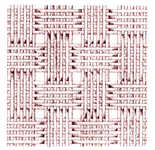
In the counted thread, groups of four stitches are worked over four threads alternating horizontal blocks with vertical blocks as shown. Because there is a slight overlap between the horizontal and vertical stitches it gives the appearance of weaving. The free embroidery is worked in exactly the same way. Also known as basket satin stitch and weaving.

In the counted thread, groups of four stitches are worked over four threads alternating horizontal blocks with vertical blocks as shown. Because there is a slight overlap between the horizontal and vertical stitches it gives the appearance of weaving. The free embroidery is worked in exactly the same way. Also known as basket filling stitch and weaving.

Work Cross stitches as shown working downwards as shown with the top legs of the second cross level with the centre of the first cross and so on.

Tent stitch is the most basic stitch in needlepoint because it is more durable. However there is a tendency to distort the fabric and so diagonal tent stitch is recommended for areas larger than a single row.
Work diagonally upwards and downwards as show. Bring the needle up and 1, down and 2 over one intersection of threads, pass the needle horizontally under two threads of canvas and up again at 3. After working a dozen or so stitches change direction by coming up through the hole to the side of the last stitch. Also known as diagonal tent stitch. Alisia`s lace stitch is a variation of this stitch.
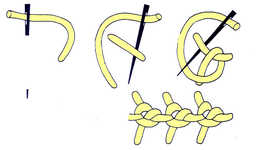
Similar to double knot stitch but worked with a wider base. It can be worked in lines, used singly or scattered randomly. Also know as knotted loop stitch.
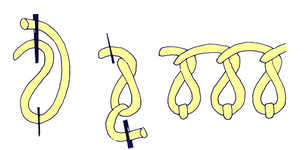
This is a looped stitch with a twist. It is also known as twisted daisy border stitch.
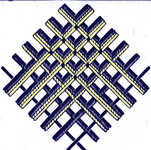
This is worked in four colours, the first must be worked in a perfectly even diagonal trellis and repeated with each successive colour alongside those already laid. A fifth thread can be used to anchor the top rows of laid threads with a small diagonal stitch.
It can be used to make jewellery and edgings.
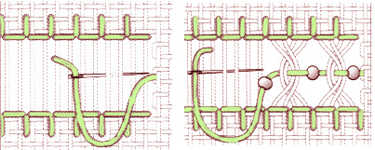
Draw out a few threads from the fabric. Fasten thread at left and then pass thread from right to left under an even number of the border threads bring needle out turning the needle to face horizontally and then make a second stitch over the same number of threads at right angles to the first. A second row of stitches is worked at the other edge of the border by taking half the threads from one group and half from the next as shown and as in ladder hemstitch.
Bring a thread out at the centre between hem stitches and pass over four threads, turn the needle and pass it under two threads from left to right. Turn again, pass over four threads and repeat. Leave a bead between each twist. See also tied hemstitch and somersault stitch.
If the hole is small it is best to attach with a beading needle.
There are several methods of attaching beads
Individually - Bring needle through fabric at place where bead is to go. Thread a bead on to the needle and let it drop onto fabric. Then insert needle into fabric just next to the place it came out. Bring needle up in right position for next stitch or bead.
In Lengths - Attach end of thread which will hold beads to beginning of design line. String required number of beads on thread. Move first bead to its right place on fabric then with another needle and thread make a small stitch over bead thread immediately after bead. Put next bead in place and repeat
By Tambour stitch - For this you need a special hook similar to a crochet hook. Trace design onto wrong side of fabric and place fabric in a frame that will leave both hands free with wrong side of fabric uppermost. Attach a long thread to wrong side of fabric then take it through to right side with left hand underneath frame. String beads onto thread. Push hook through fabric from top and bring through thread from below to form a chain stitch. With left hand put a bead into place on right side then push hook through again and pick up thread after bead and pull through to top. Continue working in this way.
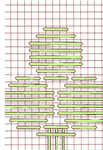
A slightly raised oval stitch used for filling. It consists of three vertical straight stitches in the centre over which are worked horizontal stitches over 4, 6 and 8 stitches as shown. If spaces are left between the ovals, tent stitch can be used to fill them or the shape can be outlined in backstitch.
Barred beetle is worked with the same stitches but the horizontals are worked first and then the three vertical stitches but with all three being worked into the same space at the bottom.
Work from right to left. Begin four threads in from end of stitch line and work two horizontal stitches from this point to the end of line. Bring needle up at starting point and make two stitches to point four threads up and two threads to the right. Bring needle through four threads to left of point and work two stitches back to point, bring needle through again four threads to left. Make two stitches to starting point and then bring needle through four stitches to the left ready to start next stitch. Continue in this way. Also known as point turc, lace stitch, turkish stitch and three sided stitch.
Lengths can be bought or if preferred to match existing furnishings, they can be made by cutting fabric on the bias and joining at the ends.
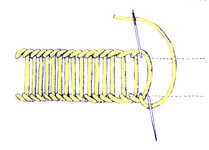
It is wider and worked more closely together and is used extensively in Hungary to form broad, heavy areas of design.
Also known as closed square chain stitch.

This is used to cover the edge of canvas and to join two pieces of canvas together. If worked on plastic canvas any rough edges must be smoothed first. A hem of unworked canvas of approximately 1 cm should be folded back one thread beyond the last row of embroidery. In the case of single canvas allow two threads to form the fold. The binding stitch is then worked along this ridge of canvas, single or double thickness for hem or seam respectively. The first two stitches are like small overcasting stitches and then the needle is taken back two threads of canvas to the beginning. From this point the stitch is like herringbone, forward over two fabric threads and back over two. The finished effect looks like plaiting. When used for a hem the lining can be brought close to the stitching on the inside edge and hemmed neatly with sewing thread.
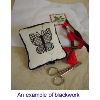
It was very popular in Tudor England although it may have come from Spain or even earlier from North Africa.
Bold outlines are worked in backstitch and then various filling stitches are used varying the density in different areas.
The geometric patterns can be varied by using some free stitches such as satin stitches, french knots and bullion knots. A little gold thread, beads or sequins can also be used.
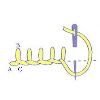
Work from left to right. Bring thread out on horizontal line (point A), insert at top of stitch (point B) and bring out again directly underneath on lower line ( point C), holding thread under needle point. Repeat along line.
Blanket stitch can be used on the edge of fabric to prevent fraying.
There are a large range of colours and the thread adds very little bulk to the embroidery thread. Since metallic threads are prone to unravel it is best to use a needle threader so that the end of the thread is disturbed less.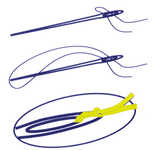
The diagram illustrates the best way to thread blending filament. For one strand leave a 5 centimetre ( 2inch) tail and for two strands fold the floss in half. Knot onto the needle as shown and then add the stranded cotton if using.
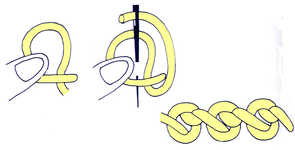
A loose loop is made around the needle and tightened after the needle has entered the fabric but before it is pulled through completely. Hold down the loop with the left thumb while pulling the needle through.
These knots are characteristic of the rich silk embroideries of China where they often are worked closely over large areas. Also known as Chinese knot, forbidden knot and pekin knot.
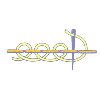
Work a row of backstitch. Interlace with a contrasting or toning thread as shown in the diagram. Also known as laced backstitch, forbidden or pekinese stitch.
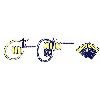
Bands of this stitch should be very close slightly overlapping rows and when used to fill shapes should all be in the same direction.
First outline shape in split stitch, then work a row of satin stitch coming up at A and down at B, with the needle inserted outside the split stitch, keeping the stitches close and even. Using the next shade, work a second row following the first exactly, coming up and C and down at D, and fitting each stitch just between those of the previous row.
To work round a curve, place the stitches slightly wider apart on the edge and slip an occasional shorter stitch in to cover the fabric.
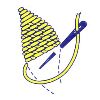
The laid thread and the couching thread are the same and the couching stitches are arranged to form part of the pattern.
Bring the thread out at the left side of the space to be filled and carry it over the space to the right side. Bring needle up just below thread and a little to the left, take it over thread and insert above, then bring it out below thread again and a little further to the left.
Continue along the line, then work the next row in the same way, making the couching threads fall in between those of the previous row as shown in the diagram.
Bokhara is a city in Uzbekistan where this was extensively worked in marriage embroideries.

Start at point A on the lower of two parallel lines. Pick up a small piece of fabric on the top line exactly opposite point A. Keeping the thread under the needle, take the thread under the loop and make a buttonhole stitch through the fabric and the base of the loop, bringing it out on the lower parallel line ready for the next stitch.

It can be worked in three colours as shown, stitch the lightest shade first then the long stitches of the medium shade and finally the dark shade
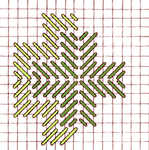
Work the inner part of the cross first as shown in the chart, working each stitch over two thread intersections except at the tips of the cross where a stitch over 1 thread is required to give a straight edge.
Then wok the outer stitches in a contrasting colour again using stitches over 1 intersection where required.
This can be worked as a single motif or interlocking to fill an area.

A row of small upright evenly spaced stitches are worked and then joined by diagonal stitches. As a single row it can be used for a border but it can also be used as a filling stitch when rows are placed above each other in straight lines. When the slanting stitches are from bottom right to top left it is known as barrier or fence stitch and when from bottom left to top right it is known as Bosnian stitch or yugoslavian border stitch. Also known as zigzag Holbein stitch.
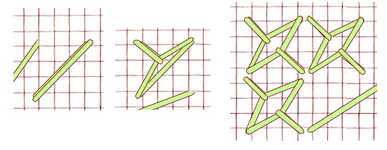
This has a textured finish reminiscent of boucle fabric. Work two diagonal stitches side by side and then make a loop from the top left hand corner to catch one thread and a second loop from the bottom right hand corner to catch the second thread. The loops should be left quite loose unlike the diagonal stitches to create the texture. It is shown worked over a square of four threads but could be larger or smaller.
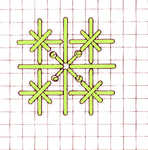 In the first example double cross stitches are worked over the whole area with the upright crosses worked over four threads. Then work vertical and horizontal stitches over four threads as shown, pulling them firmly. Finally work French knots on stalks radiating out from where the vertical and horizontal threads share holes.
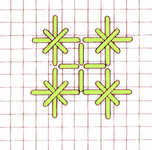
In the second variation, double crosses are worked as shown in the diagram and then four straight stitches are worked into the centre of each area between the double crosses.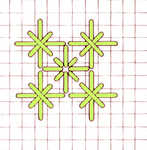
The third variation has the double crosses worked in the same positions . Next work small vertical stitches each over two threads and finally the four diagonal stitches over 1 diagonal thread intersection, all down into the same central hole. Up to four different colours can be worked for this variation.

Form boxes by working stitches over 8, 6, 4, 2 threads at right angles to each other in a square as shown. When working adjacent boxes the largest stitch is shared and not worked twice. The box is completed by a cross stitch in the centre in same or contrasting colour.
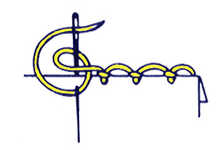
Used to edge hemmed fabrics, this stitch is worked from right to left with the knot and loop being formed as shown. It's important that all the knots and loops are regular and of the same size.
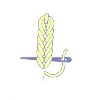
Bring needle through at top of each line and make a short stitch downwards. Bring needle up just below this stitch and pass the thread under the vertical stitch re-entering the fabric at the same place as it came out. Bring needle out just below this and pass the needle under the vertical thread again.
Continue making stitches in this way passing needle under the two preceding loops.
Also known as heavy chain stitch.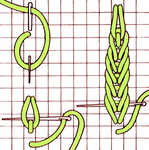
In counted thread this stitch forms a heavy outline best for leaves and foliage. Start by working a single chain stitch as shown, forming a loop and coming out two threads vertically down from the base and make a small stitch to anchor the loop. Then come up one thread down and without putting the needle through the canvas, slide the needle under the loop of the first chain stitch. Continue in this way as illustrated.
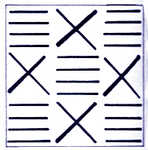
Blocks of four vertical satin stitches are alternated with single cross stitches as illustrated. This can be worked in one or two colours.
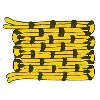
An area is filled with horizontal rows, turning sharply at the end of each row and the couching threads are placed in a `brick' pattern as shown.
Make a row of stitches with the space of one between as shown, coming up at A and down at B, up at C and down at D.
The second row is worked in the space starting half way up the original stitch, come up at E and down at F.
The third row is worked as shown using the same lower hole as in the first row.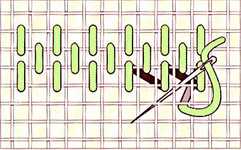
In the counted thread version rows of straight stitches are worked over two threads with a space of two threads between each stitch. The next row is started one thread below the first row. The rows interlock. Also known as alternating stitch. See also double brick stitch.

Rows consist of blocks of diagonal stitches. Each block has five stitches over 2,3,4,3,2 diagonally and four blocks are worked as shown to form a diamond. An upright cross completes the design.
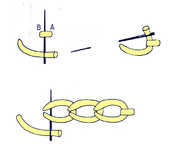
Work from right to left. Make a small horizontal stitch first and then a link under that stitch without putting the needle through the fabric. Continue making links in this way always passing the needle under the previous link. The finished chain looks exactly like chain stitch. Also known as reverse chain stitch.
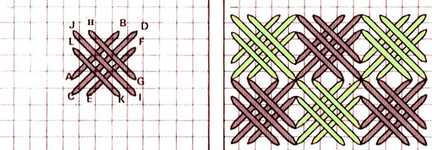
Work three diagonal stitches over 3, 4, and 3 stitches in one direction followed by three stitches in the opposite direction also over 3, 4 and 3 intersections. This can be worked in one colour or two as shown. Also known as waffle stitch.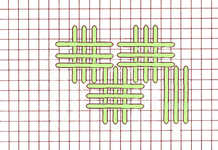
A variation is to work the stitches horizontally and vertically. First work three stitches over six threads vertically and then three stitches over six threads horizontally interlocking as shown.
See also the variation broad cross stitch worked in groups of four.
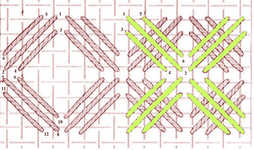
This is a variation on broad cross or waffle stitch where the groups of three parallel stitches are worked at an angle to each other to make a diamond shape and the upper stitches are also angled to form a diagonal cross shape. Contrasting colours can be used.
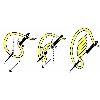
Come up at A and insert the needle at B, tucking the needle just under A as shown. Bring the needle out at C, twisting the thread first over and across the needle and then under it.
Draw flat, pulling the thread taut in the direction of the arrow. The slant of the needle from B to C is about 45°. Insert the needle at D and come out at E, parallel with and just touching A-C. Twist the thread over and then under the needle as before and draw it flat taking care not to let the loop rise up before the thread is tight.
To maintain the 45° angle keep the needle at D very close and touching A. Come up at E a little distance below C and again draw flat in the direction of the arrow.
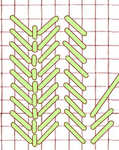
This makes a ridge shape useful for borders or filling. Work diagonal stitches as shown from top left downwards and the from bottom right upwards. Then work backstitch in the centre. This can be worked in alternate rows with fern stitch. Also known as canvas stem stitch, this is quite different from free embroidery stem stitch.
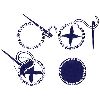
The shapes to be cut are first strengthened by outlining them with a row of running stitches. The fabric is then cut inside these shapes leaving a hem which is turned back and closely oversewn right over the running stitches.
To work a round eyelet, thread your needle with enough thread to complete and make a row of running stitches all round the outline. Cut four slits in the material from the centre to the running stitch. Fold these flaps back one at a time and sew closely over all round the edge, working right over the running stitches. The oversewn stitches should make a smooth narrow band round the edge. Cut the remaining flaps off on the wrong side.
Small holes should not be cut but pierced with the closed ends of a pointed pair of scissors or a stiletto after outlining the eyelet with backstitch instead of running.
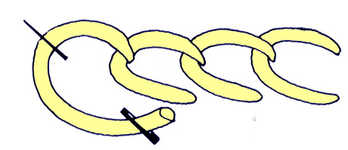
It is worked in the same way as chain stitch but the needle is inserted again outside the previous stitch as shown.
Bring needle out at top of length required for knot and make a backstitch to bottom of length required; bring needle only partly out at original point. Twist thread loosely round the top of the needle, 6 or 8 times, or enough to make the right length of stitch. Hold carefully with left thumb while pulling needle through. Turn needle ready to insert at bottom of stitch, pull the needle tight and pass needle through to back.
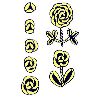
Work three bullion knots as shown to make a triangle. Then work a bullion knot to warp around one corner of the triangle putting a few extra twists on the needle so that the knot curls around instead of lying straight.
Then add another bullion overlapping half way across the previous one. Work round the triangle in this way, until a rose is formed. stem and detached chain make the flower stalk and leaves.
Adding a second ring of knots makes a larger rose which can be in a lighter shade.
This is worked at intervals along a buttonhole edging as illustrated.
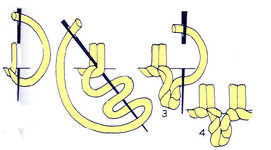
Bring the thread up through the fabric at one end of where the knot is to be made. Insert the needle at the required length of the knot at B and leaving the thread as loose as possible on the surface. Bring the needle out again at A and hold the needle in a vertical position with the left hand under the fabric, whilst the working thread is taken between the thumb and first finger of the right hand and wrapped several times around the tip of the needle, the number of times depending on the length of the stitch to be worked. Bring the left hand up to the surface and hold the coil of thread close to the fabric with thumb and forefinger. With the right hand gently ease the needle through the fabric and the coil. then pull in the opposite direction, so that the coil lies on its proper position on the fabric. Tighten the working thread by pulling it and take the needle down through the fabric again at B
It can be worked closely to cover the fabric or with the threads quite far apart to give a lacy effect. The finished effect is almost like weaving It is best done in double thread, using the darkest colour to underlay it and outlining the finished shape all round afterwards.
Lay parallel lines about quarter of an inch apart coming back up at the same side s you go down. Work a line of stitches between AB and EF going over the centre line and with the vertical stitches touching the horizontal where they meet. Leave a stitch width between vertical stitches. Then work a second row of stitches in the gaps, coming up at J and going down at K. Then work the top row coming up at L and going down at M.
If shading use a needle threaded with each colour and work along each row from left to right changing colours as required.
Silk thread is then used on top of this either solidly so that the gold only shimmers through or in a light network over the gold threads
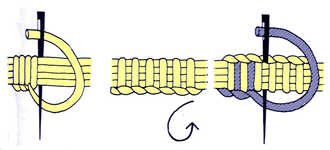
A group of threads are worked close together across a space and buttonhole stitch is worked across the bar either closely together or first one side and then the other as illustrated.
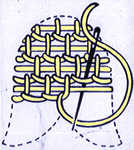
Worked from top to bottom, the thread to be couched is laid first followed by a row of buttonhole stitch. The following rows of buttonhole stitch are worked under the previous row and the couched thread as shown.
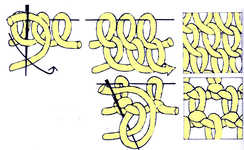
This is anchored at the top and worked in rows. It can be worked close, open or knotted to different effect.
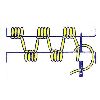
This consists of four buttonhole stitches worked alternately on each piece of fabric. Work the top row in the normal way and the bottom row as shown in the diagram.
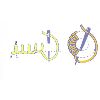
Work from left to right. Bring thread out on horizontal line (point A), insert at top of stitch (point B) and bring out again directly underneath on lower line ( point C), holding thread under needle point. Repeat along line. With buttonhole stitch the enclosed area cat be cut.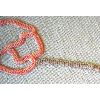 Variations on free buttonhole stitch are buttonhole wheel, closed, crossed, detached, double, knotted, german, alternating and spaced.
Basic buttonhole stitch can be threaded or whipped.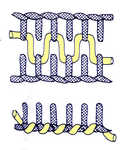
The counted thread version of buttonhole stitch is as shown in the diagram.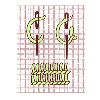
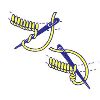
Work ordinary buttonhole stitch round edge and at intervals add picots by holding the thread down with the left thumb and twisting the needle three times round the thread. Still holding the thread firmly pull working thread until twisted threads are close to stitching then work a buttonhole stitch into upright part of last buttonhole stitch as shown in diagram.

In free embroidery this is a buttonhole stitch worked in a circle with the top of all the stitches going into the same point. A small hole should form in the centre.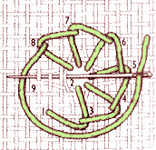
The counted thread version is worked similarly. Bring the needle up at 1 and down at 2 forming a loop. Bring the needle to the front at 3, catching the previous loop and making a new loop and so on until the circle is complete.
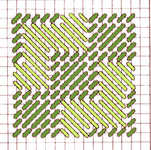
Work two diagonal stepped lines in continental tent stitch to form boxes from upper right to lower left making each step 5 stitches (counting the corner stitch in each direction.
Work Byzantine stitches in steps of 5 down over three thread intersections above and below the line of tent stitch following them but sloping the stitches in the opposite direction.
Work 2 diagonal lines of continental tent stitch as before above and below and then the Byzantine stitches again above and below those.
Finally fill in the spaces in the small boxes with diagonal straight stitches in the same direction as the tent stitch.
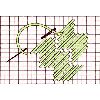
Starting at lower right corner bring needle through and up right diagonally across four intersections, insert and bring back out one thread to left of starting point. Work this stitch in regular zigzag steps.
The diagram shows four stitches to each step but it could be more or fewer. A very quick stitch to work


