Cross stitch, Needlecraft and Embroidery Glossary: Daisies to Dutch Stitch
A comprehensive illustrated needlecraft dictionary with clear definitions and working diagrams. Includes 766 terms used in cross stitch, embroidery, tapestry, blackwork, and goldwork. (Click thumbnails to enlarge.)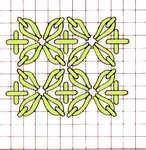
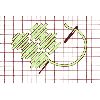
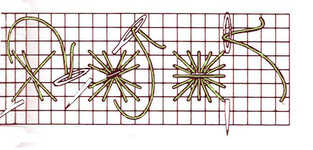
First work the upright cross stitches as shown in the diagram. Then work groups of lazy daisy stitches radiating out from the hole centrally between the upright crosses as illustrated. When stitching each loop down come up inside the loop one diagonal hole away from the central hole and go down over the loop through the next diagonal hole (2 fabric intersections away from the centre)
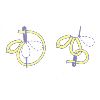
It is worked in the same way as chain stitch but the needle is inserted again just below thread to hold it down. This stitch is very useful for leaves and petals.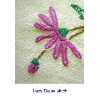
Also known as detached chain stitch or lazy daisy stitch.
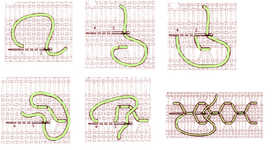
The counted thread variation is worked similarly as shown by making a loop and holding it down with a second stitch two diagonal fabric threads from the original stitch. 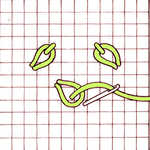
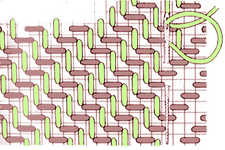
The darning is worked both horizontally and vertically, either in the same thread or in two shades of one colour to give a `shot' effect. The damask darning covers the whole surface of the fabric.
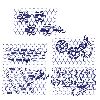
Like blackwork it is made up of bold outlines and then filled with geometric patterns.
The outlines are worked in running stitch, The pattern can be drawn on a dark stiff paper and the net pinned to it. The running stitches in thick thread, six strands of embroidery thread, can then be added before removing the paper and working the patterns in finer threads. Care has to be taken over the starting and ending threads since they will all be visible in the finished work.
The diagram shows some pattern examples.
Also known as tuille embroidery.
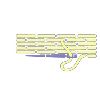
In the free version work from left to right Bring needle through at end of line and make long stitches along line, taking only a very small piece of fabric each time. Work the row below in the same way, but with the stitches beginning in the centre of the stitches of the previous row as shown in the diagram.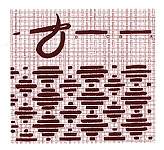
In counted thread work, darning stitch can be used to make patterns as in the diagram, coming out at A, in at B, out at C, in at D and so on.
The Denier count is the weight in grams of 9000 meters of the thread.
10 Denier means 900 meters per gram and is very fine (10-15 Denier is sometimes called ultrasheer); 15-30 Denier (sheer) is coarser; 30-40 Denier (semi-opaque) is coarser still and 40 or more Denier (opaque) is the coarsest.
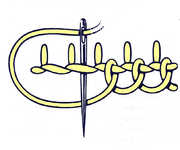
Work a row of chain or buttonhole stitch across the area to be filled. Work buttonhole stitch into this first row without putting the needle through the fabric. Work alternatively from left to right and right to left. The needle is taken down into the fabric at the end of each row.
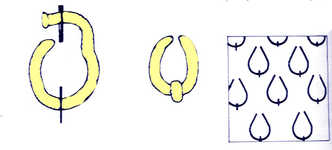
These lazy daisy stitches are worked in regular rows with alternate rows moved across a space as shown. Also known as link filling stitch and link powdering.

It is worked in the same way as chain stitch but the needle is inserted again just below thread to hold it down.
Also known as daisy stitch and lazy daisy stitch.
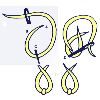
Come out at A and insert needle at B a point level with and to the left of A. Holding the thread across and then under the needle, come out again at C, a point below A and B but midway between. Anchor the stitch down at D to finish.
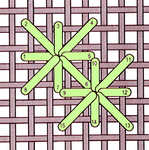
A small eyelet stitch is worked following the numbers as shown, always bringing the thread out at the edges and to the back of the fabric at the centre. An intersecting eyelet is added by following the numbering as shown.
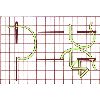
Work diagonally across fabric from bottom right to top left. This stitch is made from three small stitches instead of the basic two of cross stitch. Work upright stitch first over four threads and come out at starting point. Work diagonal stitch up right across two intersections bringing needle back out four threads to left and work final horizontal stitch over four intersections coming out at same point as illustrated. Continue in this way
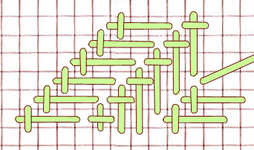
A variation on fishbone stitch which is very similar to horizontal fishbone stitch. Stitches are worked from bottom left to top right with the first diagonal row consisting of a horizontal stitch over four threads crossed by a short vertical stitch over two threads. The next row has a vertical stitch over four threads crossed by a horizontal stitch over two and these two rows alternate as illustrated.
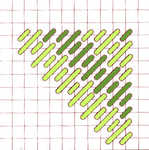
This version of Florentine stitch or bargello is worked diagonally across the fabric over 1,2,1 threads. Work the second row beside the first with the stitch over 1 thread of the second row sharing a hole with the stitch over 2 threads from the previous row as shown in the diagram.
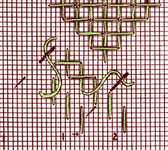
Bring needle out at point 1 and insert six threads above, bringing it back out three fabric threads to the left and three threads down. Continue for the length required and on then return working the horizontal stitches as shown. This stitch can have rows placed close together as in the diagram or with spaces which can also be filled with single faggot stitch.
Work from top left diagonally across fabric. The first stitch is made across two intersections, the second over three, the third over four, the fourth over three and the fifth over two and so on. Continue to the end of the row. In the next and following rows the smallest stitch is worked into the same hole as the longest of the previous row.
This is a quick and easy stitch and the reverse will look exactly the same as the front.

Tent stitch is the most basic stitch in needlepoint because it is more durable. However there is a tendency to distort the fabric and so diagonal tent stitch is recommended for areas larger than a single row.
Work diagonally upwards and downwards as show. Bring the needle up and 1, down and 2 over one intersection of threads, pass the needle horizontally under two threads of canvas and up again at 3. After working a dozen or so stitches change direction by coming up through the hole to the side of the last stitch. Also known as basketweave tent stitch from the pattern on the reverse of the work.

It is worked in two colours. First make horizontal stitches at short distances apart along the length of the band. Then use two needles with contrasting threads, brought through to the front of the fabric, with the lighter thread to the left. The lighter thread is slipped under the first bar, the darker thread over the first bar and under the second and under the lighter thread. The lighter thread is then passed is the over the second bar and under the third bar and darker thread and so on as illustrated.
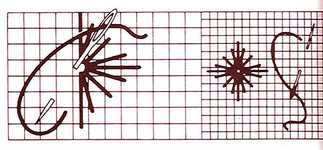
The stitched radiate from a central hole over four threads on the horizontal and vertical stitches, over two threads on the diagonals and over one thread in one direction and three in the other in the stitches in between as in the diagram.. The next row is worked with the longest stitches using the same hole as the longest thread of the first stitch as shown. 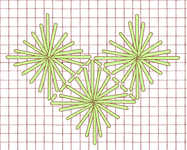
The spaces around the diamond are filled in with backstitch.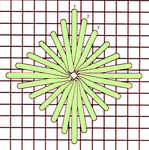
A larger stitch can be made by working over six threads in the same manner. The stitches are worked clockwise as shown and total 24.
Draw out the threads from the fabric in the usual way and then miss the same number of threads and withdraw the same number from above. Working from right to left on the right side bring thread around four border threads to the left on the lower band. Pass the needle over and behind the four threads and bring it out again at the starting point. Then make a stitch half way between the drawn threads over the next four stitches to the left Continue along the lower band. The second row is worked similarly with the lower stitches sharing the same holes as the first row as shown.
The two other edges can be worked with simple hem stitch.
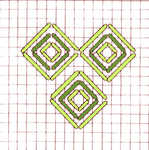
This stitch involves working horizontal rows of diamond shapes, the first over 3 threads, second over 2 and the last over 1 as shown.
Stagger the second row starting stitching 2 threads below the bottom corner of the outer diamonds of the first row.
Two or three colours can be used to work this stitch and the diamonds can be worked over more threads to give a larger pattern.
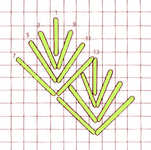
This is similar to leaf stitch but on a smaller scale and forms an attractive diamond pattern. Work the stitches as numbered in the diagram, starting with the top stitch and then working down first one side and then the other.
Start the second leaf with the top stitch coming up in the hole of step 13 of the first leaf.
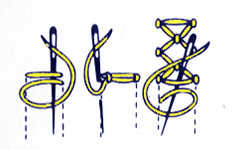 As a free embroidery stitch this can be used as a border. It is worked downwards between two parallel lines which need to be marked on the fabric before beginning. Bring needle up on left line and insert on right line and bring out directly below. Holding the thread towards the left, pass the needle under the two threads as shown and draw needle through over working thread making a knot on the right of the first stitch. Make a similar knot on the left side of the same stitch. Insert needle next to knot just made and bring out below. Make a knot in centre on lower of two horizontal stitches. Make a stitch on right line, make a knot and then make a knot on the left. Insert needle next to knot just made, bring out below and make a knot in centre and so on.
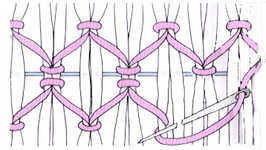 In smocking this is a decorative stitch worked after the pleats have been gathered and basic smocking stitches such as outline stitch have been worked.
Work one downward cable. Keeping the thread below the needle move up halfway to the next gathering thread and pick up the next pleat. Work one upward cable. Another row of half space waves are worked below the first as shown to create the diamond.

Worked in horizontal rows, this consists on five straight stitches over 1,3,5,3, 1 threads with each diamond fitting into the one above. The spaces are then filled in with small stitches over one thread using the same floss.

. Two backstitches are worked into the same hole to make a raised dot. This can be worked regularly as illustrated or as an outline or randomly. It is also known as simple knot stitch, rice grain or seed stitch.
As a free embroidery stitch, when double backstitch is worked closed herringbone appears on the wrong side or vice versa. Work small backstitches alternately along bottom stitch line and top stitch line. Also known as crossed back stitch and shadow stitch in white work.
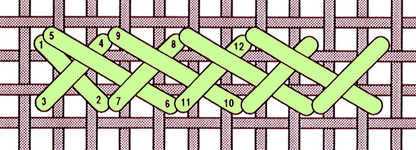 The counted version starts with a cross stitch and then a longer stitch is worked from the top left across four horizontal and two vertical fabric threads. This long stitch is crossed by a shorter diagonal stitch over two fabric thread intersections and so on, as shown in the diagram.
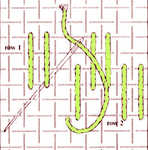
Work the first row from left to right with two stitches side by side over an even number of fabric threads, then two spaces and two stitches again. The second row is worked from right to left with stitches of the same length but half the number of threads down. See also brick stitch and alternating stitch.
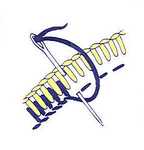
Two rows of buttonhole stitch are worked as shown with the stitches as close as possible. This is used in cut work where a row of running stitches is first used to define the shape. The first row of buttonhole stitch is then worked and the second row covers the running stitch.
The threads are grouped in pairs both across and down and can also have a different coloured thread at intervals. The stitches can either be worked over the two threads or for finer work over one. Also known as penelope canvas.
Work from top to bottom. Bring needle out at left side, hold thread down with left thumb and insert needle at right side a little above the starting point. Bringing needle out on right side, a little below the starting point and with thread below needle. then hold thread down again, insert needle at left side immediately below starting point and bring it out on the left side, the stitch being the same length as before, with thread below needle. Repeat
Also known as closed feather stitch and turkmen stitch
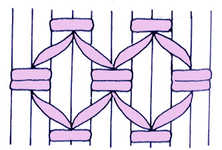 This is a decorative stitch worked after the pleats have been gathered and basic smocking stitches such as outline stitch have been worked.
Work one downward cable. Keeping the thread below the needle move up halfway to the next gathering thread and pick up the next pleat. Work one upward cable. The next row is worked in the opposite direction making a diamond pattern.
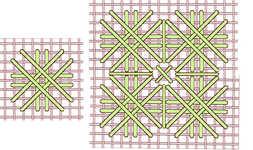
A large stitch worked over seven fabric threads square. An upright cross is made by two straight horizontal and two straight vertical stitches. A diagonal cross is then formed by two stitches from either corner. When the area to be worked is finished, a small cross stitch is worked over two fabric threads between each set of four double crosses and a the blocks can be framed by straight horizontal and vertical threads. plaited double cross is a variation.
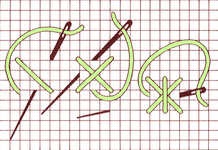
Work a single cross stitch over four threads. Bring needle out at centre of bottom cross and insert at top of cross then bring out at centre of right and at centre of left.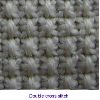 A variation on this stitch is to work the upright cross over four threads and this also sometimes known as a star stitch.
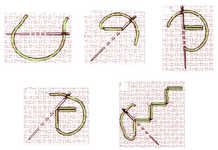
It is used for a border or regular filling pattern and can be worked in the same colour as the fabric. Work a horizontal bar over four fabric threads twice in the same place as shown. Then work a double vertical bar over four threads and so on.
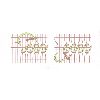
Draw out the threads from the fabric in the usual way and then miss the same number of threads and withdraw the same number from above. Working from right to left on the right side bring thread around four border threads to the left on the top band. Pass the needle over and behind the four threads and bring it out again at the starting point. Then take thread over fabric between bands and behind next four threads on lower band. Take needle over four threads and insert then bring out again on top band four threads to the left. Continue along the row.
The two other edges can be worked with simple hem stitch.
Also known as italian hem stitch.
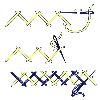
Begin a row of herringbone taking small stitches on either side, from A to B. After taking each upper stitch, B to C, slide the needle under the stitch you have just taken, AB, and continue the line of herringbone, spacing the stitches wide apart. One stitch will then always lie on top and one stitch underneath at both ends.
With contrasting thread, work another row of herringbone weaving the thread over and under as shown.
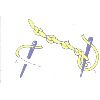
In the free stitch version work from left to right. Bring needle through at A then make a small stitch at right angles to stitch line and pull through. Pass thread over and then under the stitch on surface without needle entering the fabric. then hold thread down with left thumb and pass the needle again over and under the stitch on surface. Pull thread through to make a knot. Space knots evenly and fairly close for best effect. Also known as tied coral stitch, old english knot stitch, smyrna stitch and palestrina stitch. 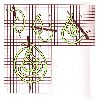
The counted thread version is worked as shown in the diagram. It can be used a continuous string or individual stitches.
Work a single cross over four threads. Bring needle out one thread below top left and insert one thread above bottom right. Continue round square moving one thread at each side every time until 8 stitches have been made in all.
Also known as holbein embroidery.
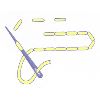
Also known as holbein stitch.
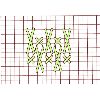
Work from left to right, make small cross over two thread square and oblong cross over 6 threads vertically and two threads horizontally.
Alternate crosses on next row as shown.
Also known as alternating cross stitch.
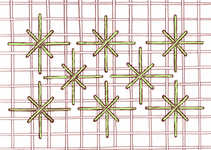
Work the first upright cross over four fabric threads with a cross stitch over two threads on top. Work from left to right and top to bottom with the stitches fitting together as shown.
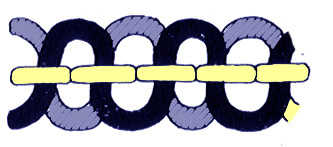
Having worked a row of backstitch, bring needle through centre of one stitch, then weave thread under stitches first from left to right and then right to left and so on without the needle entering the fabric. A third thread can then be worked in the opposite direction as shown in the same way.
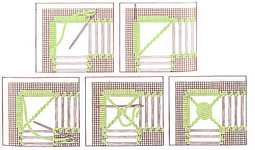
The edges of the fabric are reinforced with buttonhole stitch. Bring the needle out at lower left corner and insert at upper right corner coming out at corner opening.
Oversew the laid thread working from upper right to lower left corner. Take needle to back of fabric and slip it through the buttonhole stitches coming up at the top left hand corner of the square.
Bring needle over laid thread and insert into the fabric at lower right corner. Come out again at the opening pulling the thread tight enough to form an even `X' with the other thread.
Oversew the second thread to the centre and then weave over and under the laid threads at centre point going anti-clockwise until dove's eye is desired size.
Oversew remainder of diagonal to upper left corner. Secure stitching thread at back of fabric by running needle through buttonhole stitches along top edge of open square.
Stitches used include algerian eye, backstitch, double backstitch, chessboard filling, cobbler filling, four sided stitch, honeycomb filling, mosaic filling, pin stitch, punch stitch, ringed backstitch, three sided stitch, reverse faggot stitch, coil filling stitch, wave stitch filling and whipped satin stitch.
In drawn thread work, unlike drawn fabric work threads are cut to make the holes. Some stitches are however common to both. Also known as pulled thread embroidery.
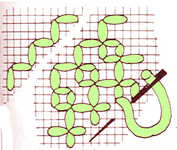
Diagonal rows of stitches over three fabric intersections are worked from bottom left to top right On the return squares are worked over two fabric intersections as illustrated. Also known as net filling stitch.
Stitches used are hem stitches - simple, ladder, zigzag and double hem or italian hem stitch.
The lengths of wider drawn threads can be tied using interlaced hem stitch or groups can be knotted. Also known as hardanger.
In drawn thread work threads are cut to make holes in the fabric, but in drawn fabric work the spaces are made by pulling threads tight without cutting. Some stitches are however common to both styles.
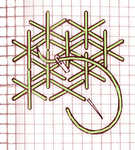
This is a useful stitch for an all over pattern. It is formed by working an oblong cross stitch, spanning four vertical threads and two horizontal. To complete work a single vertical straight stitch over four horizontal threads in the centre to complete the star. The ends of these straight stitches should share holes with the ends of adjoining stars as shown.
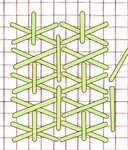 Double Dutch stitch is a variation which is also worked with oblong cross stitch over four vertical and two horizontal stitches. The vertical straight stitch is worked over three threads, not four and the next cross stitch is worked directly below, sharing the same spaces. Alternate crosses have the vertical bar, and when the crosses are complete vertical straight stitches over four threads are worked between the crosses. Also known as Dutch double cross stitch.


