Cross stitch, Needlecraft and Embroidery Glossary: Cable chain stitch to Cut work
A comprehensive illustrated needlecraft dictionary with clear definitions and working diagrams. Includes 766 terms used in cross stitch, embroidery, tapestry, blackwork, and goldwork. (Click thumbnails to enlarge.)
Bring needle out at top of stitch line. Hold the thread down with your left thumb while the needle is twisted first under and over the thread. Insert needle into the fabric at B and still holding the thread down, bring it up at C and pull through.
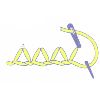
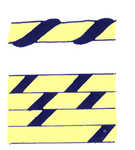
Rows of this stitch can be interlaced by a contrasting thread as shown, making interlaced cable chain stitch.
This is worked in a combination of stem stitch and knots.
The threads can be grouped in pairs ( double canvas or Penelope) and can also have a different coloured thread at intervals. The fine canvas can be used with cotton threads for detailed work and the wider meshes with wools for rugs.
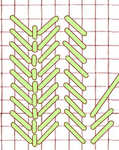
This makes a ridge shape useful for borders or filling. Work diagonal stitches as shown from top left downwards and the from bottom right upwards. Then work backstitch in the centre. This can be worked in alternate rows with fern stitch. Also known as broad stem stitch, this is quite different from free embroidery stem stitch.
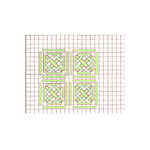 consisting of ordinary rice stitch surrounded by groups of straight stitches to make blocks. The second and third straight stitches share holes with the adjacent blocks. The space between blocks can be filled with a cross stitch.
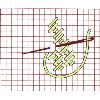
Working from the right start with a small stitch across one intersection insert and bring needle out one thread to the left of starting point. Make second stitch across two intersections to form big stitch. Make a further big stitch and then start with a small stitch again.
Work second row alongside as shown.
Also known as continuous cashmere stitch.
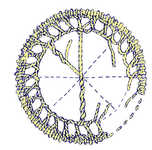
A running thread is worked to define the circle and then a circle of blanket stitch is worked with loops facing inwards. A second row is worked inside the first which doesn't pass through the fabric. Four straight stitches make the spokes and a second thread looped over these as shown.
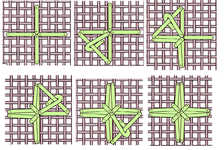
Work four stitches in a cross into the same central hole each over four fabric threads as shown. Work a loose diagonal stitch across one corner and tie it down with a small stitch starting one diagonal stitch from the centre and pull it tight through the central hole. Continue around the four sides. A small Celestial Eyelet is worked in the same way but the original four stitches are each over two threads.
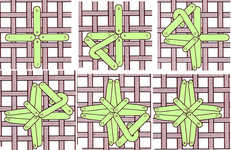
Work four stitches in a cross into the same central hole each over two fabric threads as shown. Work a loose diagonal stitch across one corner and tie it down with a small stitch starting one diagonal stitch from the centre and pull it tight through the central hole. Continue around the four sides. A large celestial eyelet is worked in the same way but the original four stitches are each over four fabric threads.
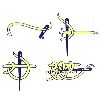
Using a blunt (tapestry) needle come out at A and insert at B to form the base line the width of the shape to be embroidered. If this is wide hold down with small stitches. This stitch is always worked from left to right. Bring the needle out at C and slip under the base stitch from D to E, going over the thread where it comes out at C. Do not enter the fabric.
Make another stitch exactly the same and continue until the end of the line. Then come up at G immediately below C and slip the needle behind the first loop of the previous row, horizontally under two threads as shown and continue to the end of the row.
When all the required rows have been worked fix the loops of the last row down with small stitches.
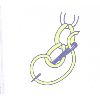
As a free embroidery stitch formed by loops of thread being drawn through one another to make a chain. There are many variations on this stitch.
Bring needle out at top of stitch line. Holding thread down below stitch, insert needle again at top of stitch and bring it out again on stitch line above thread. Repeat along stitch line. 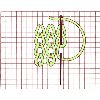
As a counted thread stitch, work in vertical rows from top left. Bring needle out and holding thread down with left thumb, insert needle into same space and bring it out again two threads down. Draw through the loop already made and insert needle in to same loop as shown. Chain stitch as a filling stitch leaves two threads between each row.
Variations on chain stitch include broad, broken, cable, chequered or magic, closed square, detached or daisy, hungarian braided chain, interlaced cable, detached twisted, whipped, backstitched, double, heavy, open, reverse, rosette, russian, crested, twisted and zigzag cable and braid stitch.
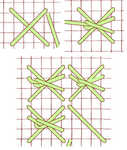
A small filling stitch which makes a neat finish and is hardwearing enough to be used on chair seats. Work a cross stitch over four fabric threads and then overstitch horizontally with a twisted chain stitch which is anchored with a small diagonal stitch. The rows are worked from left to right and top to bottom.
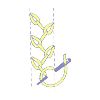
Start at top, working down between two parallel lines. Bring thread through at left and make a chain stitch slanting towards the centre. Tie this down with a stitch about the same length as the chain, also slanting inwards. Bring needle out again at right side, just below the bottom of chain stitch, and make another chain stitch slanting towards centre. Tie this down in the same way as previous stitch. Continue in this way.
It consists of very fine wire closely coiled into a tiny spring like length.
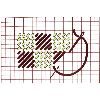
The best way to work the squares is in diagonal rows starting at the upper left hand corner.
Chequer stitch is used for filling large areas to give a fabric effect although it is effective in small areas
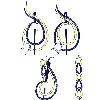
Thread the needle with two colours. Come out at A and insert needle at B holding one loop under the needle with the thumb. That colour will make a chain, next time hold down other colour to alternate colours.
Also known as magic chain stitch.
As a counted thread stitch, it is used in drawn fabric work.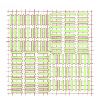
It consists of regular blocks of satin stitch worked vertically and horizontally as shown in diagram. Each satin stitch is worked over three threads of fabric and pulled tightly and each block is composed of three rows of ten stitches.
A fine thread works best for this stitch.
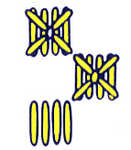 The free embroidery version of this stitch is worked by making a group of four satin stitches and then a cross stitch over each group with a small vertical stitch in the centre where the stitches cross. They groups are spaced as a chessboard as shown with unstitched fabric in the spaces.

A quickly worked stitch with two sets of squares worked alternately. The first set is consists of four straight stitches, overstitched by a large cross stitch worked over the whole group and then a small horizontal straight stitch. The next set consists of four straight stitches and so on.
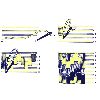
Lay parallel lines, approximately one quarter of an inch apart, always coming back up at the same side to give short stitches on the reverse.
With the first colour come up below line 1, pass over line two and insert needle just beyond line 3. Make four stitches together and then come up below line 2 and insert just below line 4. Make four stitches like this, and another 4 stitches one bar below, and then return making four stitches each time.
Then repeat with second colour below first and third colour below that.
When the edge is reached shorter stitches are used to finish.
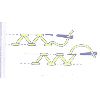
Work from right to left Bring needle up on lower line, insert a little to right and bring up again halfway between these two points. Insert needle on top line a little to right and bring out just to the left on the top line. Insert again on top line to right and bring out at centre of stitch on top line.
Work in this way alternately on top and bottom line. Variations are closed chevron stitch, half chevron stitch and whipped chevron stitch.
Also a stitch used in smocking. This is a decorative stitch worked after the pleats have been gathered and basic smocking stitches such as outline stitch have been worked. 
Work one downward cable. Keeping the thread below the needle move up halfway to the next gathering thread and pick up the next pleat. Work one upward cable. Also know as wave stitch. See also double chevron.
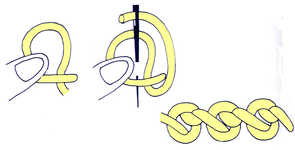
A loose loop is made around the needle and tightened after the needle has entered the fabric but before it is pulled through completely. Hold down the loop with the left thumb while pulling the needle through.
These knots are characteristic of the rich silk embroideries of China where they often are worked closely over large areas. Also known as pekin knot, forbidden knot and blind knot.
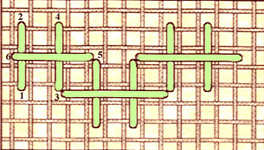
This lacy stitch is worked by crossing two straight vertical stitches over four threads with a vertical stitch over five threads and interlocking as shown in the diagram. This makes a useful border stitch in samplers.
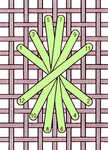
The first thread is worked diagonally downwards over five fabric intersections, the second starts one space diagonally up and right from the first and is inserted one diagonally down and to the left and so on following the numbering.
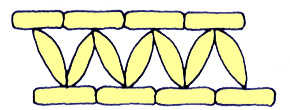
Work from right to left Bring needle up on lower line, insert a little to right and bring up again halfway between these two points. Insert needle on top line exactly above the end of the lower stitch and bring out just to the left on the top line. Insert again on top line to right and bring out at centre of stitch on top line.
Work in this way alternately on top and bottom line. There are no spaces in the two lines of stitches as illustrated.
Work from top to bottom. Bring needle out at left side, hold thread down with left thumb and insert needle at right side a little above the starting point. Bringing needle out on right side, a little below the starting point and with thread below needle. then hold thread down again, insert needle at left side immediately below starting point and bring it out on the left side, the stitch being the same length as before, with thread below needle. Repeat
Also known as double chain stitch and turkmen stitch.
In the free embroidery version, When double backstitch is worked closed herringbone appears on the wrong side or vice versa. Work small backstitches alternately along bottom stitch line and top stitch line.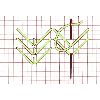
A counted thread stitch when used in drawn fabric work, it is best worked on the wrong side and when pulled tightly a raised effect is made. In the counted thread version, work first from top to bottom making a diagonal stitches downwards over four intersections, insert needle and bring out two horizontal threads below starting point. Continue like this to bottom, then work second row upwards with diagonals in opposite direction.
When complete work a line of backstitch over two threads down the middle. Also known as herringbone filling stitch.
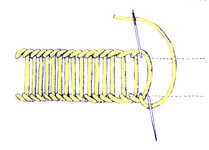
It is wider and worked more closely together and is used extensively in Hungary to form broad, heavy areas of design.
Also known as big writing.

Work a series of straight stitches over the area to be covered, spacing them evenly chequer board fashion as shown. Using a blunt (tapestry) needle and contrasting thread and working from right to left, come up at A and work the first row sliding through the stitches in the order A, B, C, D and so on always keeping the needle facing to the left.
When that row is finished, the second row is started at E going through B , F etc. and so on until the area is covered.
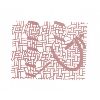
Work horizontal rows first. Start at bottom right corner and make a stitch vertically over four threads. Bring needle out again four threads to the left of starting point. Make another vertical stitch over four threads then bring needle out two threads to left of bottom line. Continue in this way working vertical stitches alternately after four threads and two threads to the end of row. Leave two threads before starting second row which is worked in exactly the same way as the first but left to right.
Continue until all horizontal rows are worked then turn fabric round at right angles to work vertical rows in exactly the same way.
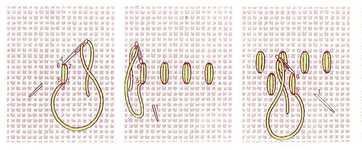
Coil filling stitch is formed by groups of satin stitches worked in horizontal rows. Work three stitches as shown in the same place. Move to next group four fabric threads to the left and repeat. Work second row from left to right as shown with the top of the stitch at the same as the bottom of the row above but half way between the stitches.
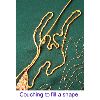
Two lengths of threads are used in the needle and the thread to be couched is laid across the shape and anchored with slanting threads before the next thread is laid.
This sitch has its origins in New Mexico.
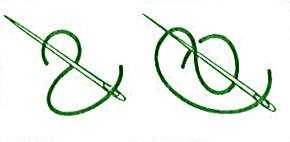
Similar to a french knot but makes a bolder stitch and is used extensively in candlewicking.
To make dramatic statements colours are taken from the opposite side of the wheel. For a three colour design colours can be chosen at 120° to each other. For more muted designs colours can be taken from the same segment of the circle.

Work in diagonal rows from top right to bottom left of the area to be worked. Work a horizontal and vertical stitch each over three fabric threads sharing a hole. Then work two diagonal stitches at the bottom right each over two intersections. The stitches interlock as shown to form a tight filling stitch.
Work left to right bringing thread out at top of first stitch, insert needle diagonally down over crossed threads to bottom of stitch, then bring out to the right of the first stitch. Continue in this way to the end of row. The second row is worked from right to left inserting the needle at top of stitch. Continue working rows backwards and forwards until the area is filled making sure all the stitches slope in the same direction.
However, if working large blocks this method also known as just tent stitch has a tendency to distort the canvas and the alternative stitching method of basketweave or diagonal tent stitch is more effective.

Working from the right start with a small stitch across one intersection insert and bring needle out one thread to the left of starting point. Make second stitch across two intersections to form big stitch. Make a further big stitch and then start with a small stitch again.
Work second row alongside as shown.
Also known as cashmere stitch.
Work from left to right. Bring needle out on stitch line, lay it along line and hold down with your left thumb. Take a small stitch under the line from top to bottom as shown in the diagram and pull through with needle over the lower thread. See also zigzag coral stitch which is used for borders.
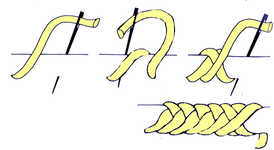
This can be used to finish cushions. The two pieces of fabric have the raw edges turned in and tacked together with the right sides outermost. Work the stitching as shown.
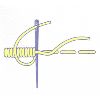
The cording thread should be quite thick and well twisted. Place the cording thread along the line to be worked and then with the top thread work vertical oversewing stitches over it so that it is completely covered.
It can be worked from left to right or right to left if preferred.
In hardanger or drawn thread work overcasting over loose threads is also called cording.
A thread size in this system is the number of 840 Yard lengths of a single strand required to make 1 pound in weight.
For example a Cotton Count of No.40 (or #40) means it will take 33600 (= 40 x 840) yards to weigh one pound. So, the finer the thread, the higher the Cotton Count number.
A size given as 40/3 means the thread has 3 strands each one of which has a count of 40. This is sometimes called the Composition Standard.
It comes in several thicknesses and is generally used to produce a slightly raised effect.
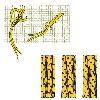
An open weave fabric is needed for the base material and it must be stretched tightly over a frame. A strong waxed silk or cotton thread must be used for couching the pairs of gold threads.
Bring the needle out at A go over the gold thread and back in to the fabric at the same point A. The thread is pulled tightly so that the gold thread sinks into the fabric. Cut and plunge the gold threads at the end of each line, do not turn them.
The pattern of the couching can be varied to give different effects. This must be used with finer gold threads, not japanese gold.
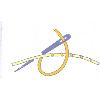
Lay the thread to be couched along the design line. Bring the needle with couching thread through just beneath the design line and insert it just above, over the thread to be couched.
Repeat at intervals but not so close that the couching thread spoils the effect of the thread being couched.
Variations on couching include bokhara, roumanian, colcha, new england, roman, thorn stitch, trellis, italian, battlement, buttonhole, turkish and underside. Different effects and patterns are created by each. 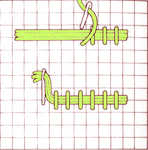
Couching can also be worked over evenweave fabric or canvas when the thread or ribbon to be couched is too bulky to pass easily through the fabric. The thinner couching thread is worked at regular intervals using the threads of the fabric.
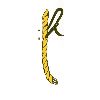
Bring the needle out at A just outside the cord but very close to it and go in at B right in the middle of a cord, pull tightly so that the stitch disappears.
The stitches can be spaced every two or three twists of the cord.
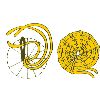
With a pencil draw lightly regularly spaced lines radiating out from the centre to use as a guide when couching. Fold a length of gold in half and sew down loop end at the centre of the circle. Work round and round in ever increasing circles sewing down the two gold strands together and placing a couching stitch on each pencil line.
To end off smoothly, plunge one gold thread through the fabric, slightly ahead of the other.
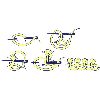
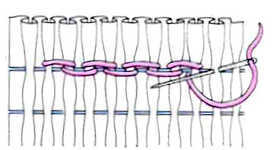
Make a horizontal chain, bring the needle up at A, form a loop and return the needle through the same hole, and come out at B, inside the loop. Immediately above the chain, make a coral stitch. Insert the needle at C and out at D where C to D is about half the length of A to B. Take the thread over and then under the needle as shown, holding it with your left thumb as you pull through. Then slide the needle under the connecting thread between the chain and the coral stitches without entering the fabric and pull through gently.
Return to the base line to start the next chain stitch.
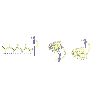
It can be placed in parallel rows or varied in length to fill a shape such as a leaf or petal. Work from left to right.
Bring needle through just above the centre of space being worked. With thread to the right, insert needle at the bottom of space and bring it up just below centre, with thread under needle. Still with thread to right, insert needle at top of space and bring it out just above centre with thread under needle. Continue in this way.
Also known as persian stitch, long armed feather stitch and when worked in a straight line quill stitch and alternating buttonhole stitch.
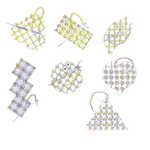
Especially characteristic of crewel work are trellis stitches, where long threads are laid down to fill an area usually at right angles and then each intersection is `tied down' with small stitches. A few examples are shown,
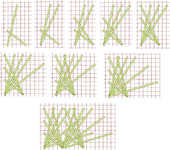
A large scale stitch with a woven appearance. It consists of five slanting stitches worked from the bottom left hand corner and four from the bottom right worked alternately as shown. The next complete stitch is worked in the same way using the right hand space for the first stitch as the left hand space for the second stitch. This stitch should be worked in horizontal rows and from left to right.
The stitches are worked by forming loops on the hook and combining with the stitches already worked in different ways. Stitches are chain, single crochet, half double crochet, double crochet, treble crochet etc.
There is a fundamental difference between USA and British naming of the stitches and you must always check which terminology a pattern is using. The equivalence are:-
USA UK
dc double crochet=treble (tr)
dtr double triple crochet=triple treble(trip tr)
hdc half double crochet=half treble (htr)
sc single crochet = double crochet(dc)
trc triple crochet = double treble (dbl tr)
tr trc triple triple crochet = quadruple treble (quad tr)
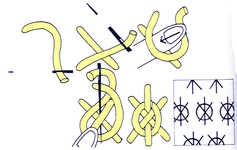
This is worked in a regular pattern with alternate rows in the space of the previous one. An ordinary cross stitch is worked as a foundation and is then crossed by a longer vertical stitch. This stitch enters the fabric only at the top and bottom and is looped round the centreof the cross stitch , making a twisted chain stitch with a long tail.
Also known as moss stitch.
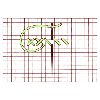
Stitches may be completed singly or worked in rows. Working from left to right make a stitch over the diagonal making up the second stroke of the cross on the return. The size of the stitch depends on the thread and fabric used. With Aida the cross is made over one intersection, on evenweave the cross is normally made over two intersections and in canvas work with wool it might be made over four intersections.
It is the main stitch of counted cross stitch designs. See also small scale cross stitch and staggered cross stitch
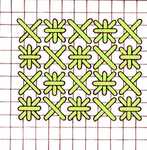
Work small scale smyrna stitches over 2 threads leaving two threads between, alternating the gaps from row to row in a checkerboard pattern. Then with a contrasting thread work cross stitches over two threads in the spaces between the small smyrna stitches.
The symbols can be solid colour, black and white pattern or coloured pattern and a separate key is given.
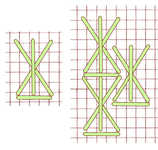
An elongated cross stitch is worked as shown over 4 horizontal threads and 6 vertical threads. A straight vertical stitch and an underline horizontal stitch are then added. The second vertical row is then offset by three threads and interlocks.

When crossed back stitch is worked closed herringbone appears on the wrong side or vice versa. Work small backstitches alternately along bottom stitch line and top stitch line. Also known as double backstitch and shadow stitch in white work.
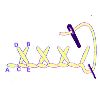
Work from left to right. Bring needle out at point A, insert at the top of the stitch to the right at point B and bring out again at point C on bottom line half way between A and B, holding the thread under the needle. Now insert needle at D above C and bring out at E on bottom line underneath B, again holding the thread under the needle. Continue in this way.
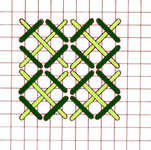
First work a large cross stitch over four threads and then a small diagonal stitch over two threads across the tip of each corner in turn. Always work the large cross in the same order so that all the top stitches lie the same way.
This stitch can be worked in a single shade or in two colours when it would be best to have a needle for each. See also crossed corners upright cross stitch.
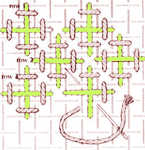
First work a large upright cross stitch over four threads and then a small straight stitch over two fabric threads across the tip of each corner in turn. Always work the large cross in the same order so that all the top stitches lie the same way.
This stitch can be worked in a single shade or in two colours when it would be best to have a needle for each. See also crossed corners cross stitch.
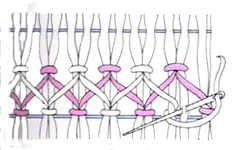
Work one downward cable. Then work a half space wave upwards and continue in wave stitch along the row. Using a different colour of thread, work another row crossing the first on the free pairs of pleats.
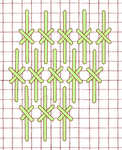
A more textured variation of gobelin stitch. Each row has straight stitches worked over six threads and spaced by two threads horizontally. An ordinary cross stitch is worked over the centre of each long stitch. The rows are worked horizontally in either direction with each row worked into the space in the row above as illustrated.
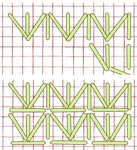
This is worked in horizontal rows with a group of three stitches radiating from one hole alternating with a straight horizontal stitch. Alternate rows are worked in opposite directions. When the whole area is filled a backstitch is added between rows as shown.
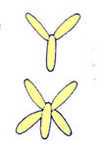
Work as fly stitch but bring needle up in the centre again and make a straight stitch each side of the centre stitch the same length as the centre stitch
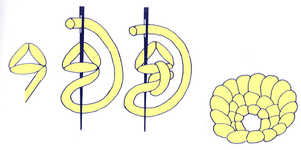
A foundation triangle is made and then looped stitches are made without entering the fabric again. More rows can be added to give greater depth.
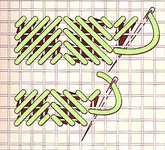
A group of seven diagonal stitches are worked in the same slanting direction to form a square over 1,2,3,4,3,2,1 threads. A variation on this, reversed cushion stitch, can be obtained by alternating the direction of each group of stitches as shown. Also a smaller cushion stitch and reversed cushion stitch can be worked with five diagonal stitches over 1,2,3,2,1 threads.
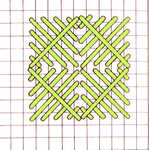 A variation uses a contrasting thread worked over each square in the opposite direction to the satin stitch squares
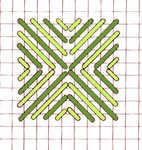 A second variation is worked as shown with two colours alternating..
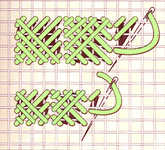 Crossed corners cushion stitch is worked by overstitching one half of the square with stitches in the opposite direction.
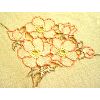
Traditionally cut work was done on a fine closely woven linen in white or a neutral colour. See also eyelet hole.


